How to use Surfshark on Windows?

In the competition of VPNs, Surfshark is one of the best VPNs because of its amazing price and high-quality output. You can easily watch your favorite movies and series unavailable in your region due to geo-restrictions.
For people living, you can browse those worldwide websites that are only available for residents of a particular country with the help of Surfshark on Windows.
You can also use Surfshark on multiple devices, such as Surfshark on Samsung TV, Windows devices, iOS, Apple TV, Smart TV, Roku, and many more. It is an excellent choice for securing your NetGear Router and offers versatile compatibility with multiple devices, making it the Best VPN for NetGear Router.
Surfshark is famous for its amazingly discounted prices and many incredible features, just like other extremely expensive VPNs. With Surfshark on Windows, you can surf all the restricted websites with extreme security and privacy.
Extending its exceptional features to the Mac platform, Surfshark on Mac in USA ensures a seamless and secure browsing experience. The same level of security and privacy that users enjoy on Windows is replicated on Mac, providing a consistent and reliable VPN solution across different operating systems.
In rare instances where Surfshark encounters issues on Windows, resulting in Surfshark not Working in USA, swift resolution is essential. Don’t be disheartened; our troubleshooting guide empowers you to swiftly address any hiccups, ensuring that the unbeatable features and security of Surfshark seamlessly resume, allowing you to navigate restricted websites with confidence and privacy.
Some people don’t know how to set up a Windows VPN. Installing Surfshark on Windows is pretty straightforward.
In this article, we will cover how you can download Surfshark for Windows and install Surfshark on Windows. This article is focused on users who want to use Surfshark on Windows 7 and later versions.
How To Set Up Surfshark On Windows: Quick Guide
If you are in a hurry, here is a quick guide on how to set up a Windows VPN like Surfshark on Windows. Just follow these easy steps:
How to Install & Use Surfshark on Windows — Step-by-Step Guide 2023

Following is a detailed guide that will help you with Surfshark download Windows installation. It will not only be quick to use, but you will also have the opportunity to discover so many features and mold them as per your needs. So download Surfshark Windows and install the Surfshark application on Windows now!
Let us guide you through the process of Surfshark download Windows installation:
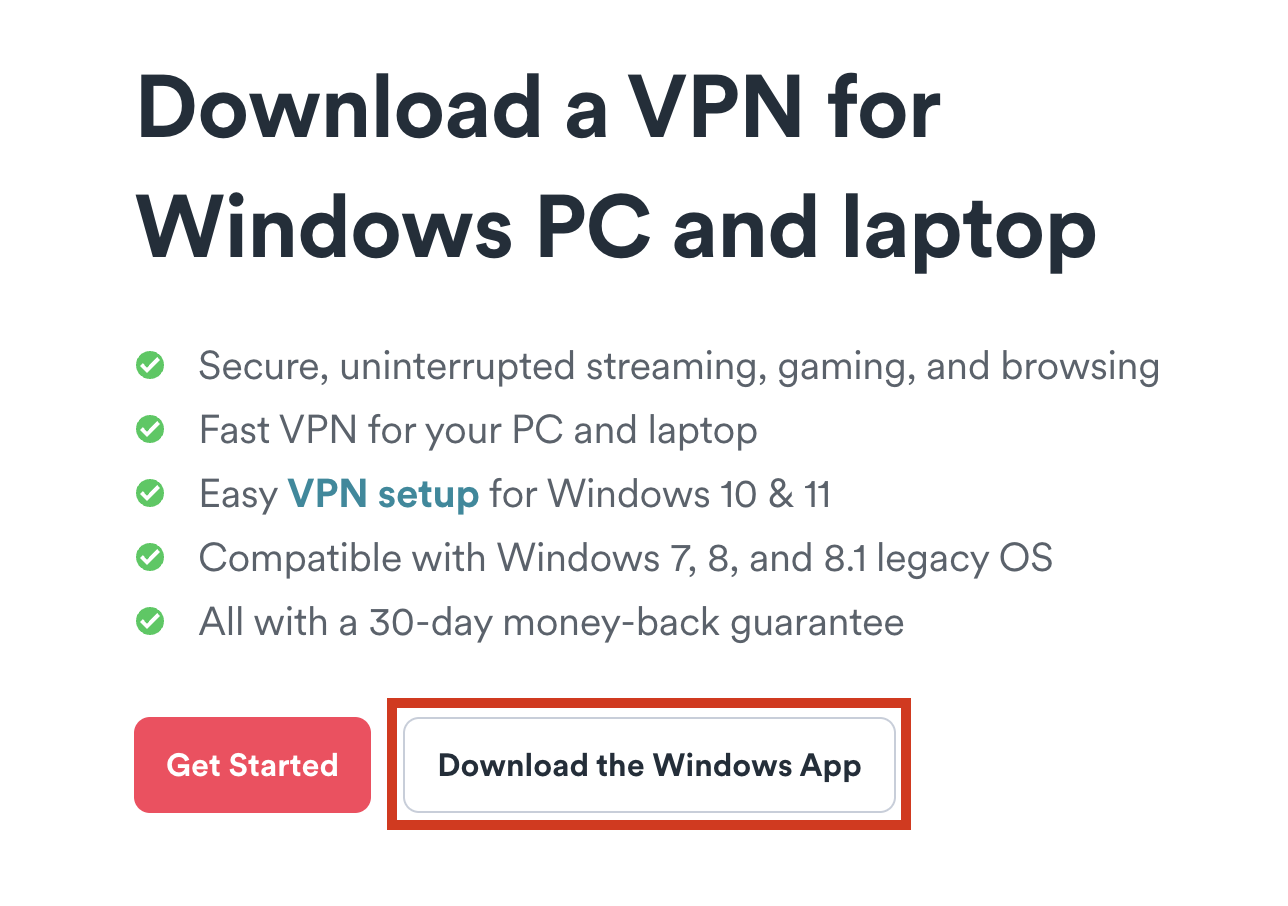
Download the App
- Go to their website and download Surfshark for Windows by clicking the “Download the Windows App” button on their download page.

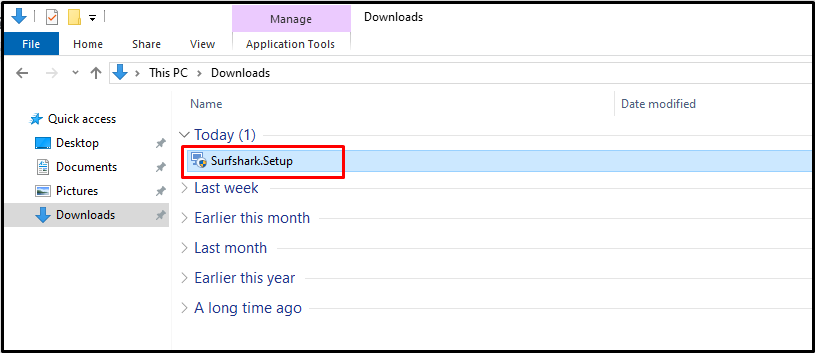
- After the Surfshark Windows download is completed, go to your file explorer and find where you installed the file to download Surfshark for Windows. There is a high chance that you will find it in the download folder if you haven’t modified any download location.

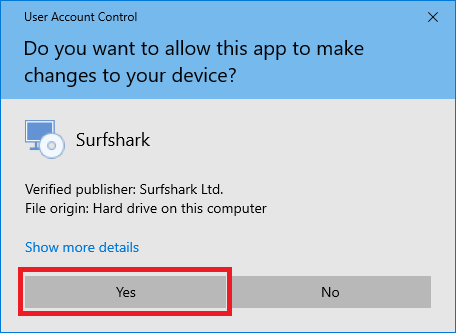
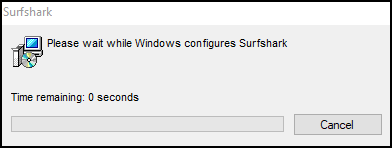
Install The App
- Launch the Surfshark setup file by double-clicking on it.
- A pop-up window will appear asking, “Do you want to allow this app to make changes to your device?” Click the “Yes” button.
- Let the installation finish automatically.
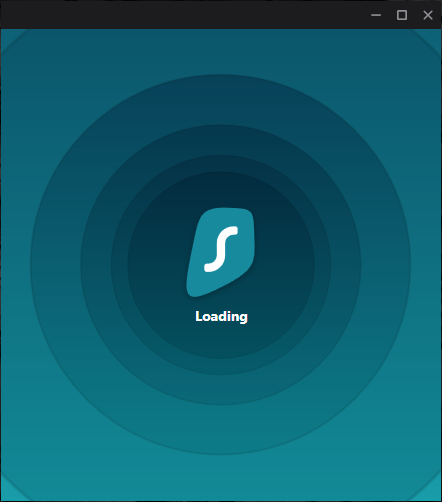
- After the app is installed, it will launch on its own after a few seconds, and you can finally use the Surfshark Windows compilation.
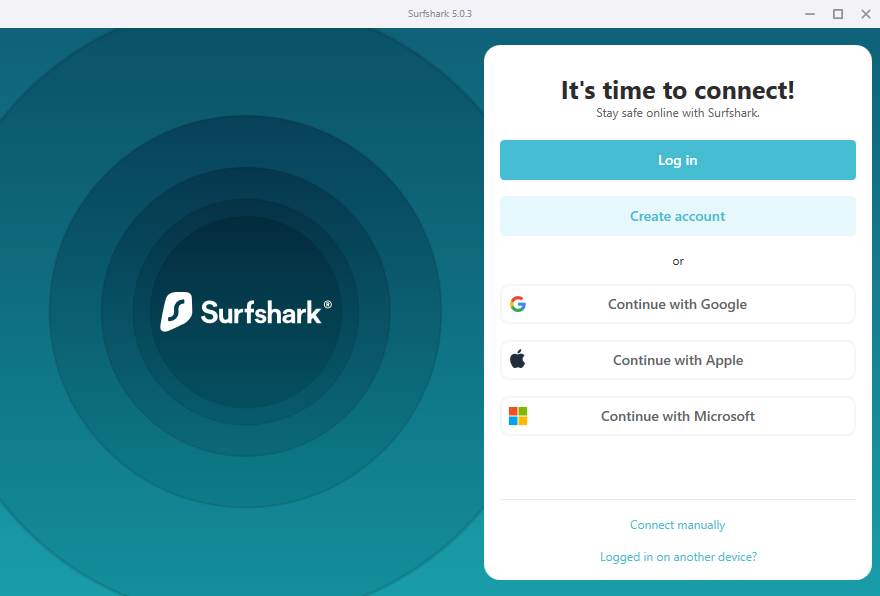
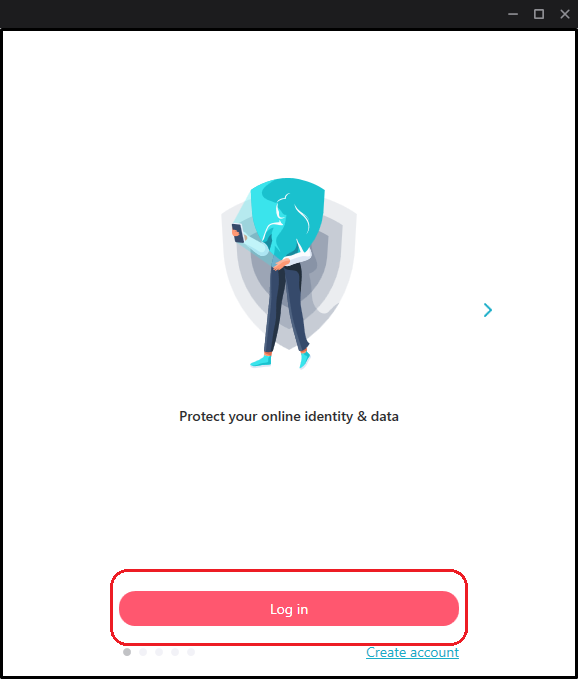
Log into the App
- After the Surfshark Windows app is launched, click on “Log In” if you already have a Surfshark account. If you do not have a subscription, click the “Create Account” button.
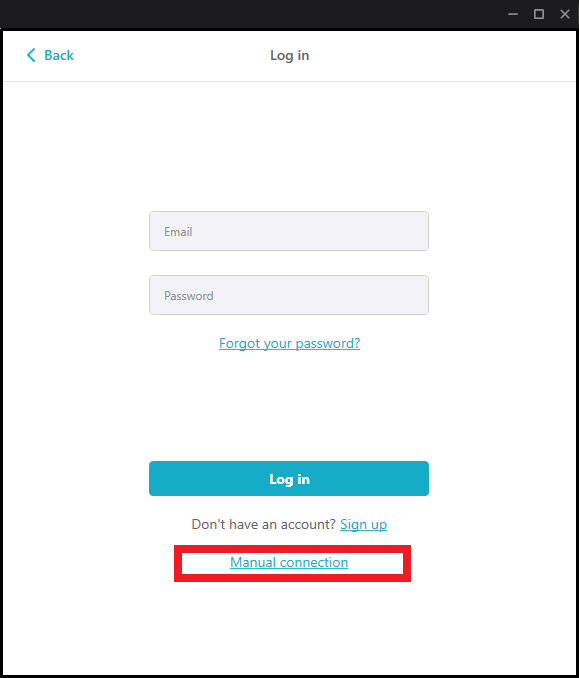
- Once you reach the Login page, enter your email and password and click the “Log In” button again.
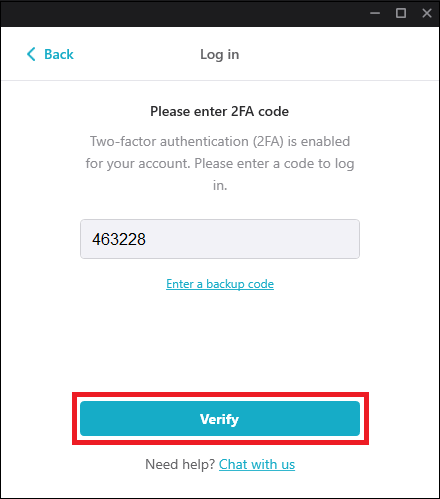
- Enter a 2FA authentication code if you have enabled the two-factor authentication for your Surfshark account. Click on “Verify” after entering the code.

Connect to the VPN
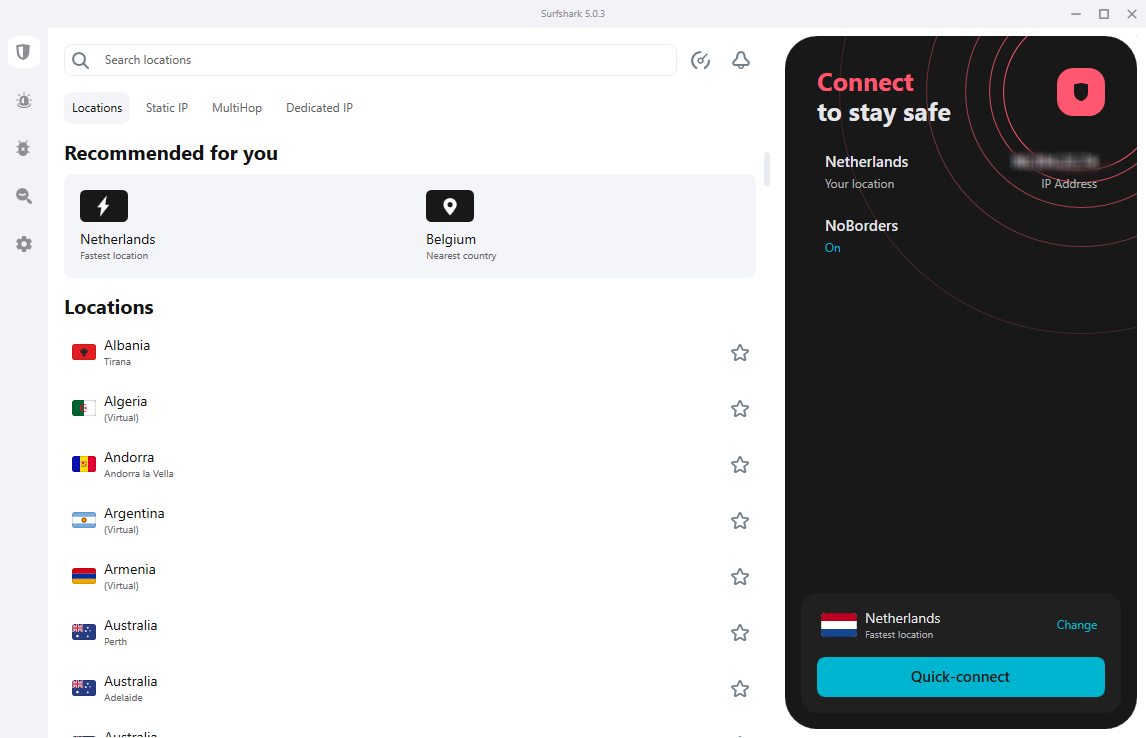
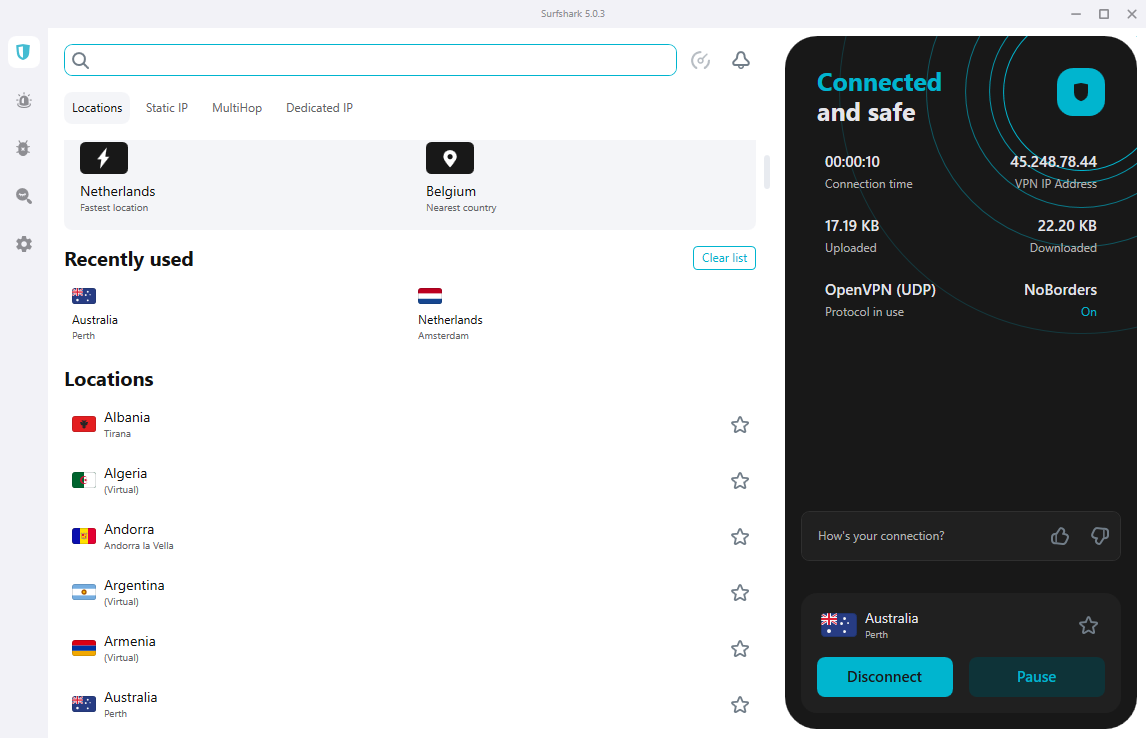
- After successfully logging in to your Surfshark account, you will see the main dashboard of the SurfShark Windows App.
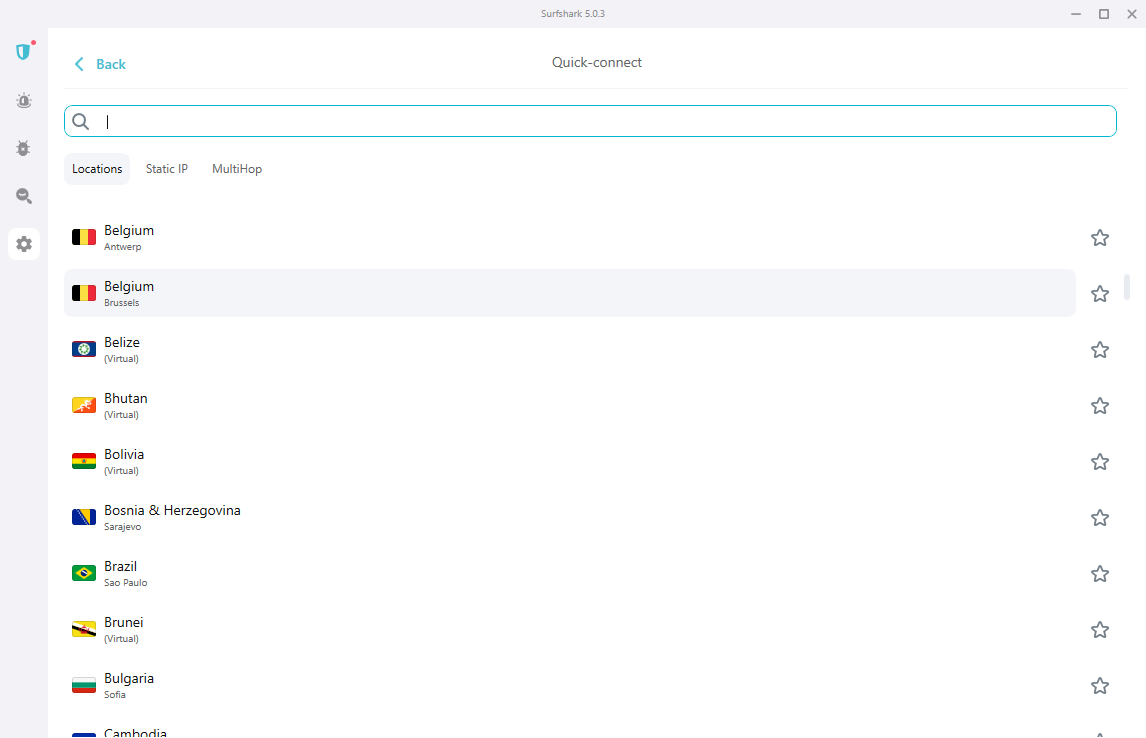
- Here, you can connect to your closest country of residence by clicking on the Quick Connect button. And this is how to set up a VPN on Windows.
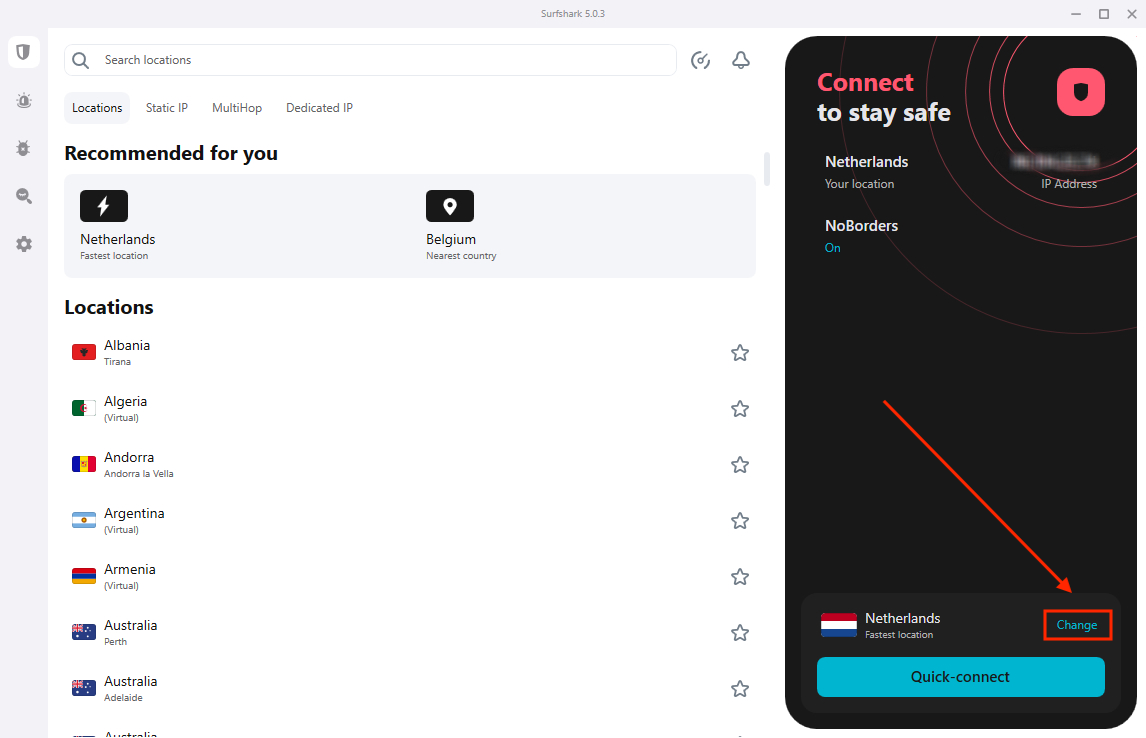
Here, you will be able to see all the locations that you’ve used in the past. You will also pause or disconnect from this page. - If you want to change the location, simply click the Change button.
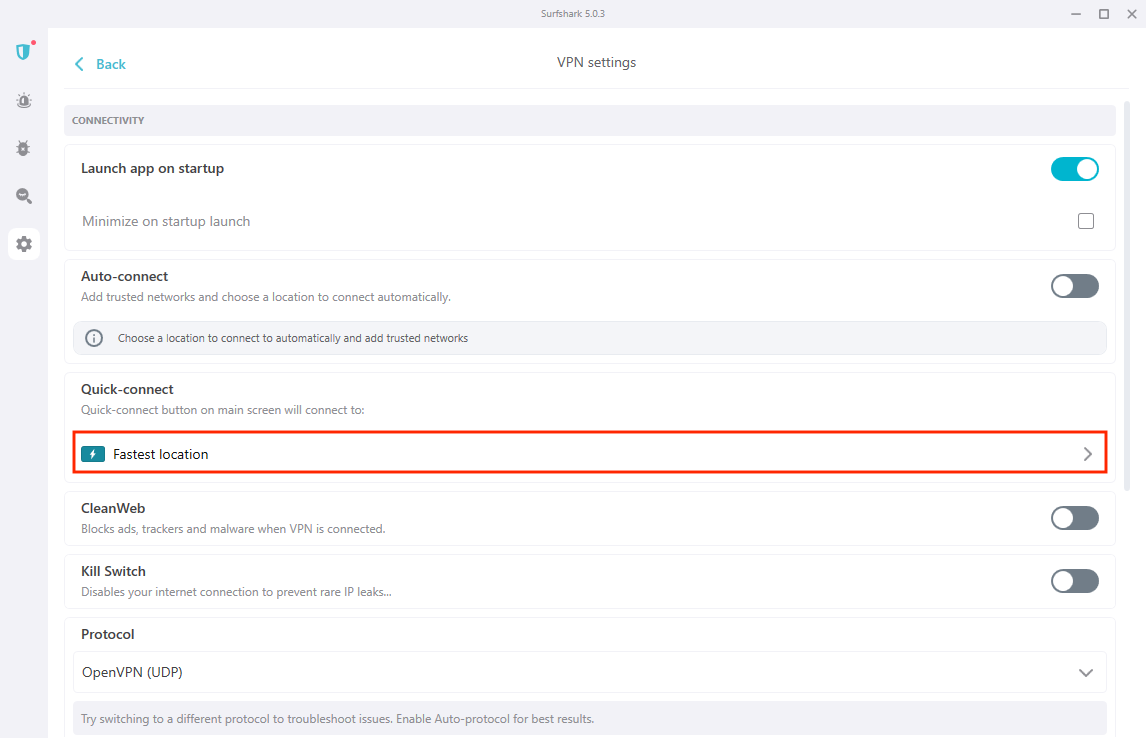
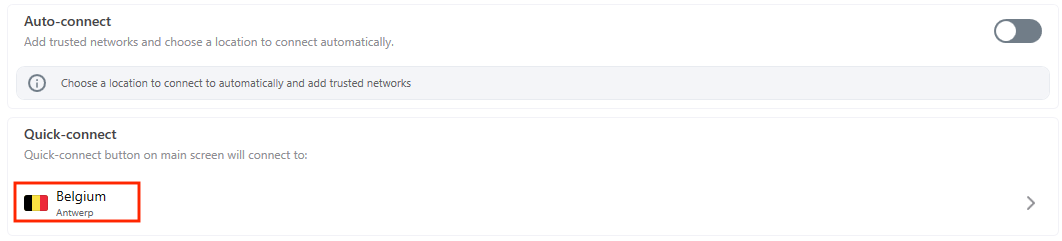
- If you want to change your Quick Connect button location, go to settings, click on VPN settings, click on Quick Connect, and discover the whole list of locations available.
- Select any one location from the list, and then it will appear in the settings tab.
Manage Surfshark Locations
With over 100 countries, Surfshark VPN download for PCs is a good option because it has over 3200 servers from all over the world. You can click on them, and you will directly connect to them.
- If you want to mark a location as your favorite, click on the star icon next to the location name. You can find your favorite locations in the “Favorites” section.

On the Surfshark Windows app, you can see three options: Static IP, MultiHop, and Dedicated IP. Here are their uses.
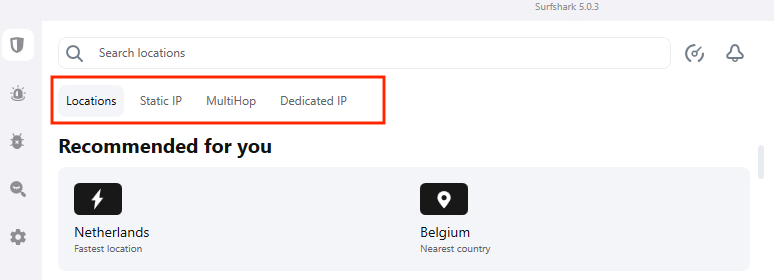
- Static IP: Get the same IP address whenever you connect to the servers with Static IP.
- MultiHop: Get connected to two servers simultaneously. You can choose both servers as well.
- Dedicated IP: You can also purchase a dedicated IP with this option. This IP will only be yours and not available to other users.
To choose the best server, you can do a latency and speed test with the help of the Surfshark speed test USA feature. You can find the inbuilt Sufshark’s Speed Test by heading to Settings>VPN settings>Speed test.
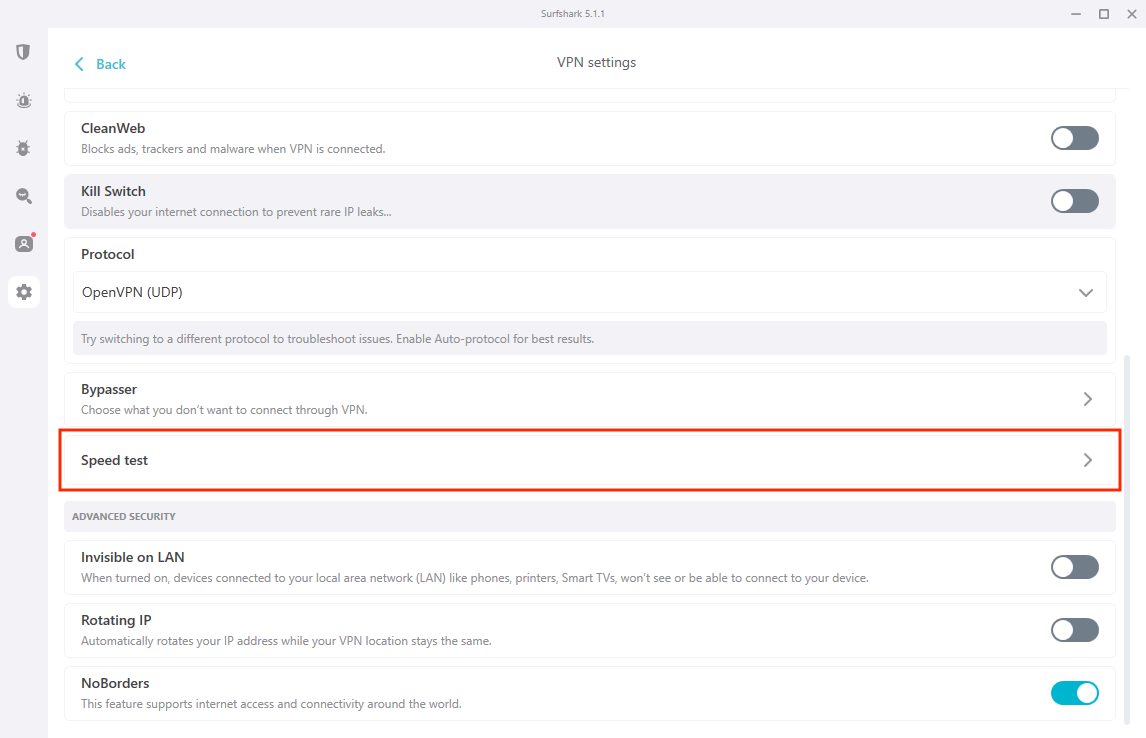
You can select lists such as favorite, recently used, and others, according to your choice, and then click on Run Test to start testing for the best server.
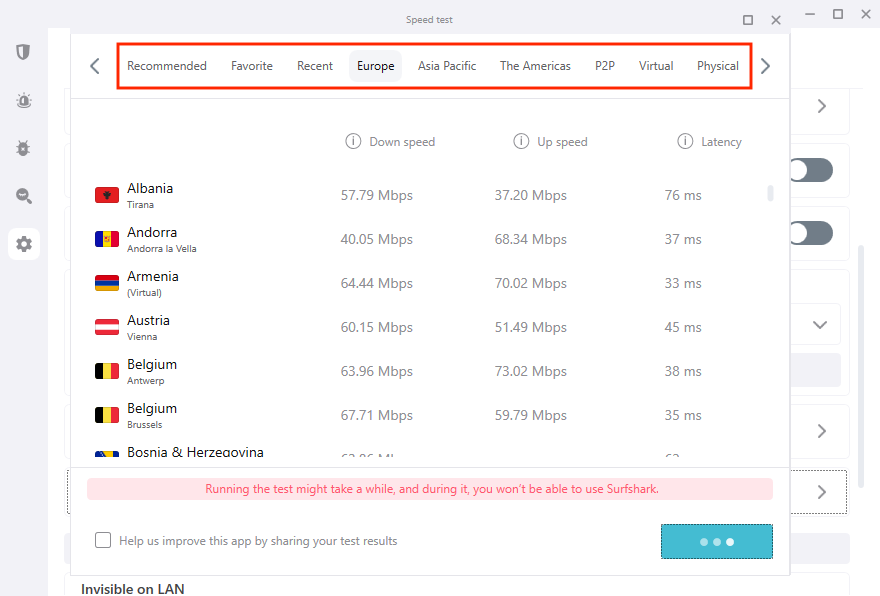
Locations that have higher speeds and low latency will appear as the best ones in the test results after a few seconds of wait.
Manage Surfshark features
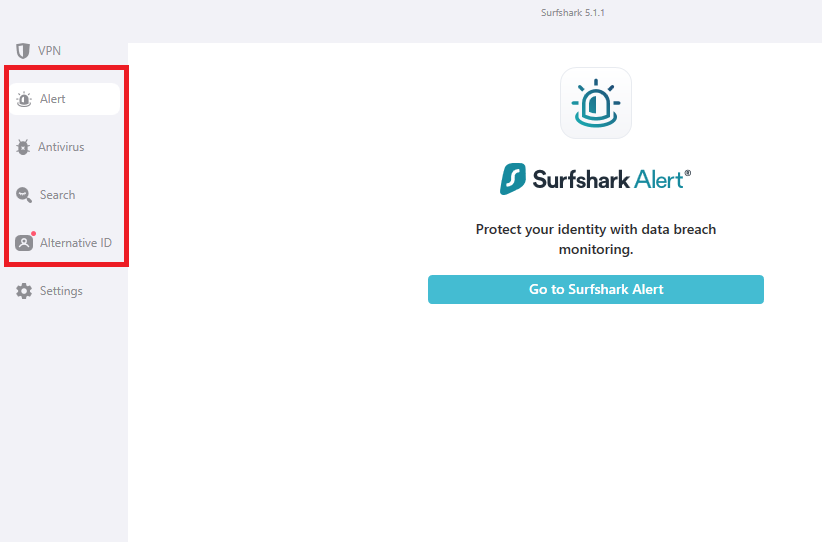
If you see the top-left side of the Surfshark Windows app, you will find 4 amazing features that are available to all the users who have an active Surfshark ONE subscription. Here are their uses:
-
- Alert: This feature will update you if any personal and private info, such as card details, ID number, etc, is available on any online database.
- Search: With this feature, you can search on the internet and get organic results without being tracked and targeted by unwanted advertisements.
- Antivirus: Get protected from malware and viruses and get real-time protection with this built-in Antivirus by Surfshark VPN download for PC.
- Alternative ID: Build a new identity online with a new email. This tool will help you reduce spam emails, give email and name protection, and much more.
Manage Surfshark settings
There are a lot of customizations that you can do to your Surfshark Windows applications according to your liking. Just click on the Settings and click on the App Settings. In this section, you can make the following customizations.
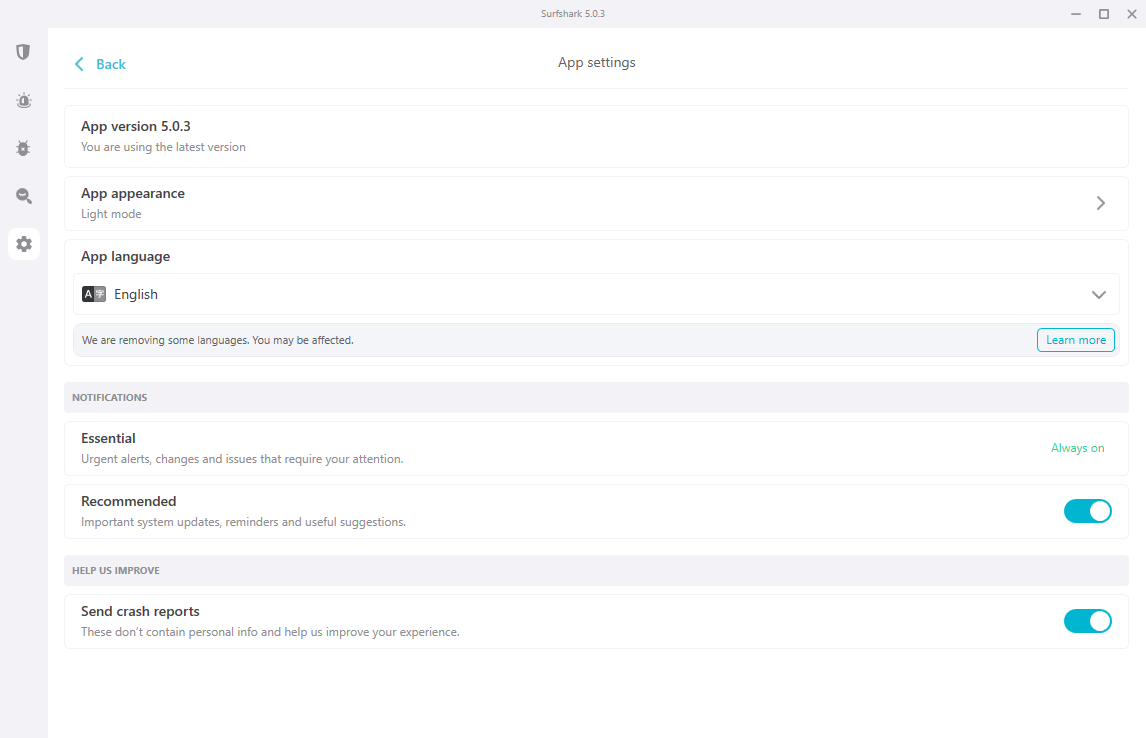
You can opt for the following under these settings:
- Use the app in dark mode.
- Change the app’s language to your preferred language.
- View which version you are currently using.
- Change notifications settings and send crash reports.
There are also some advanced settings that you can do on your Surfshark for Windows app.
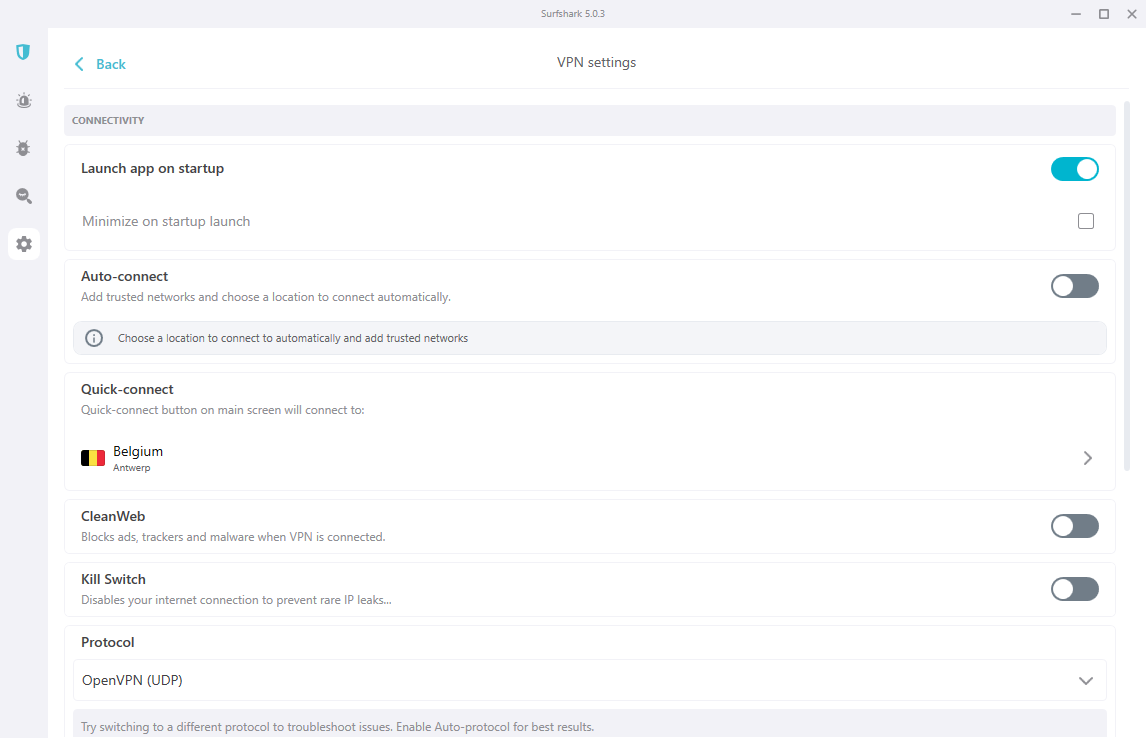
You can opt for the following under these settings:
- Use the Auto-connect feature.
- Change the Launch app on the startup service. When you enable this, the app will launch whenever you open your system.
- Make changes to the connection protocol.
- Use the CleanWeb feature to block ads, malware, phishing attempts, and trackers.
- Use the KillSwitch feature to protect your information and stop all traffic if the VPN disconnects.
- Use the NoBorders feature to connect in environments that are network-restricted.
- By enabling Bypasser, you can allow a few websites and apps to bypass the VPN.
- With the Rotating IP feature, you can change your IP every 5 to 10 minutes without disconnecting from the VPN.
- Turn on the Invisible on LAN feature to make your device invisible to the devices using the same network as yours.
Manage the Surfshark Tray Menu
When you close the Surfshark for Windows app, you can still use it with the minimized version available and active on the System Tray. You can keep track of whether you are currently using the VPN or not.
- If the icon is green, you are connected to the VPN.
- If the icon is grey, you are not connected to the VPN.
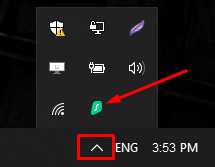
- You can drag the icon from the system tray to the taskbar so that you can always see it.
- With this small icon on the taskbar, you can switch the location and other settings.
![]()
How to connect manually using the Surfshark Windows app
You can connect manually to the VPN using the Surfshark Windows app after you have downloaded the Surfshark for Windows by performing the following steps:
- Start the Surfshark for Windows app by double-clicking on it and then Log In.
- Click on the Manual Connection option.
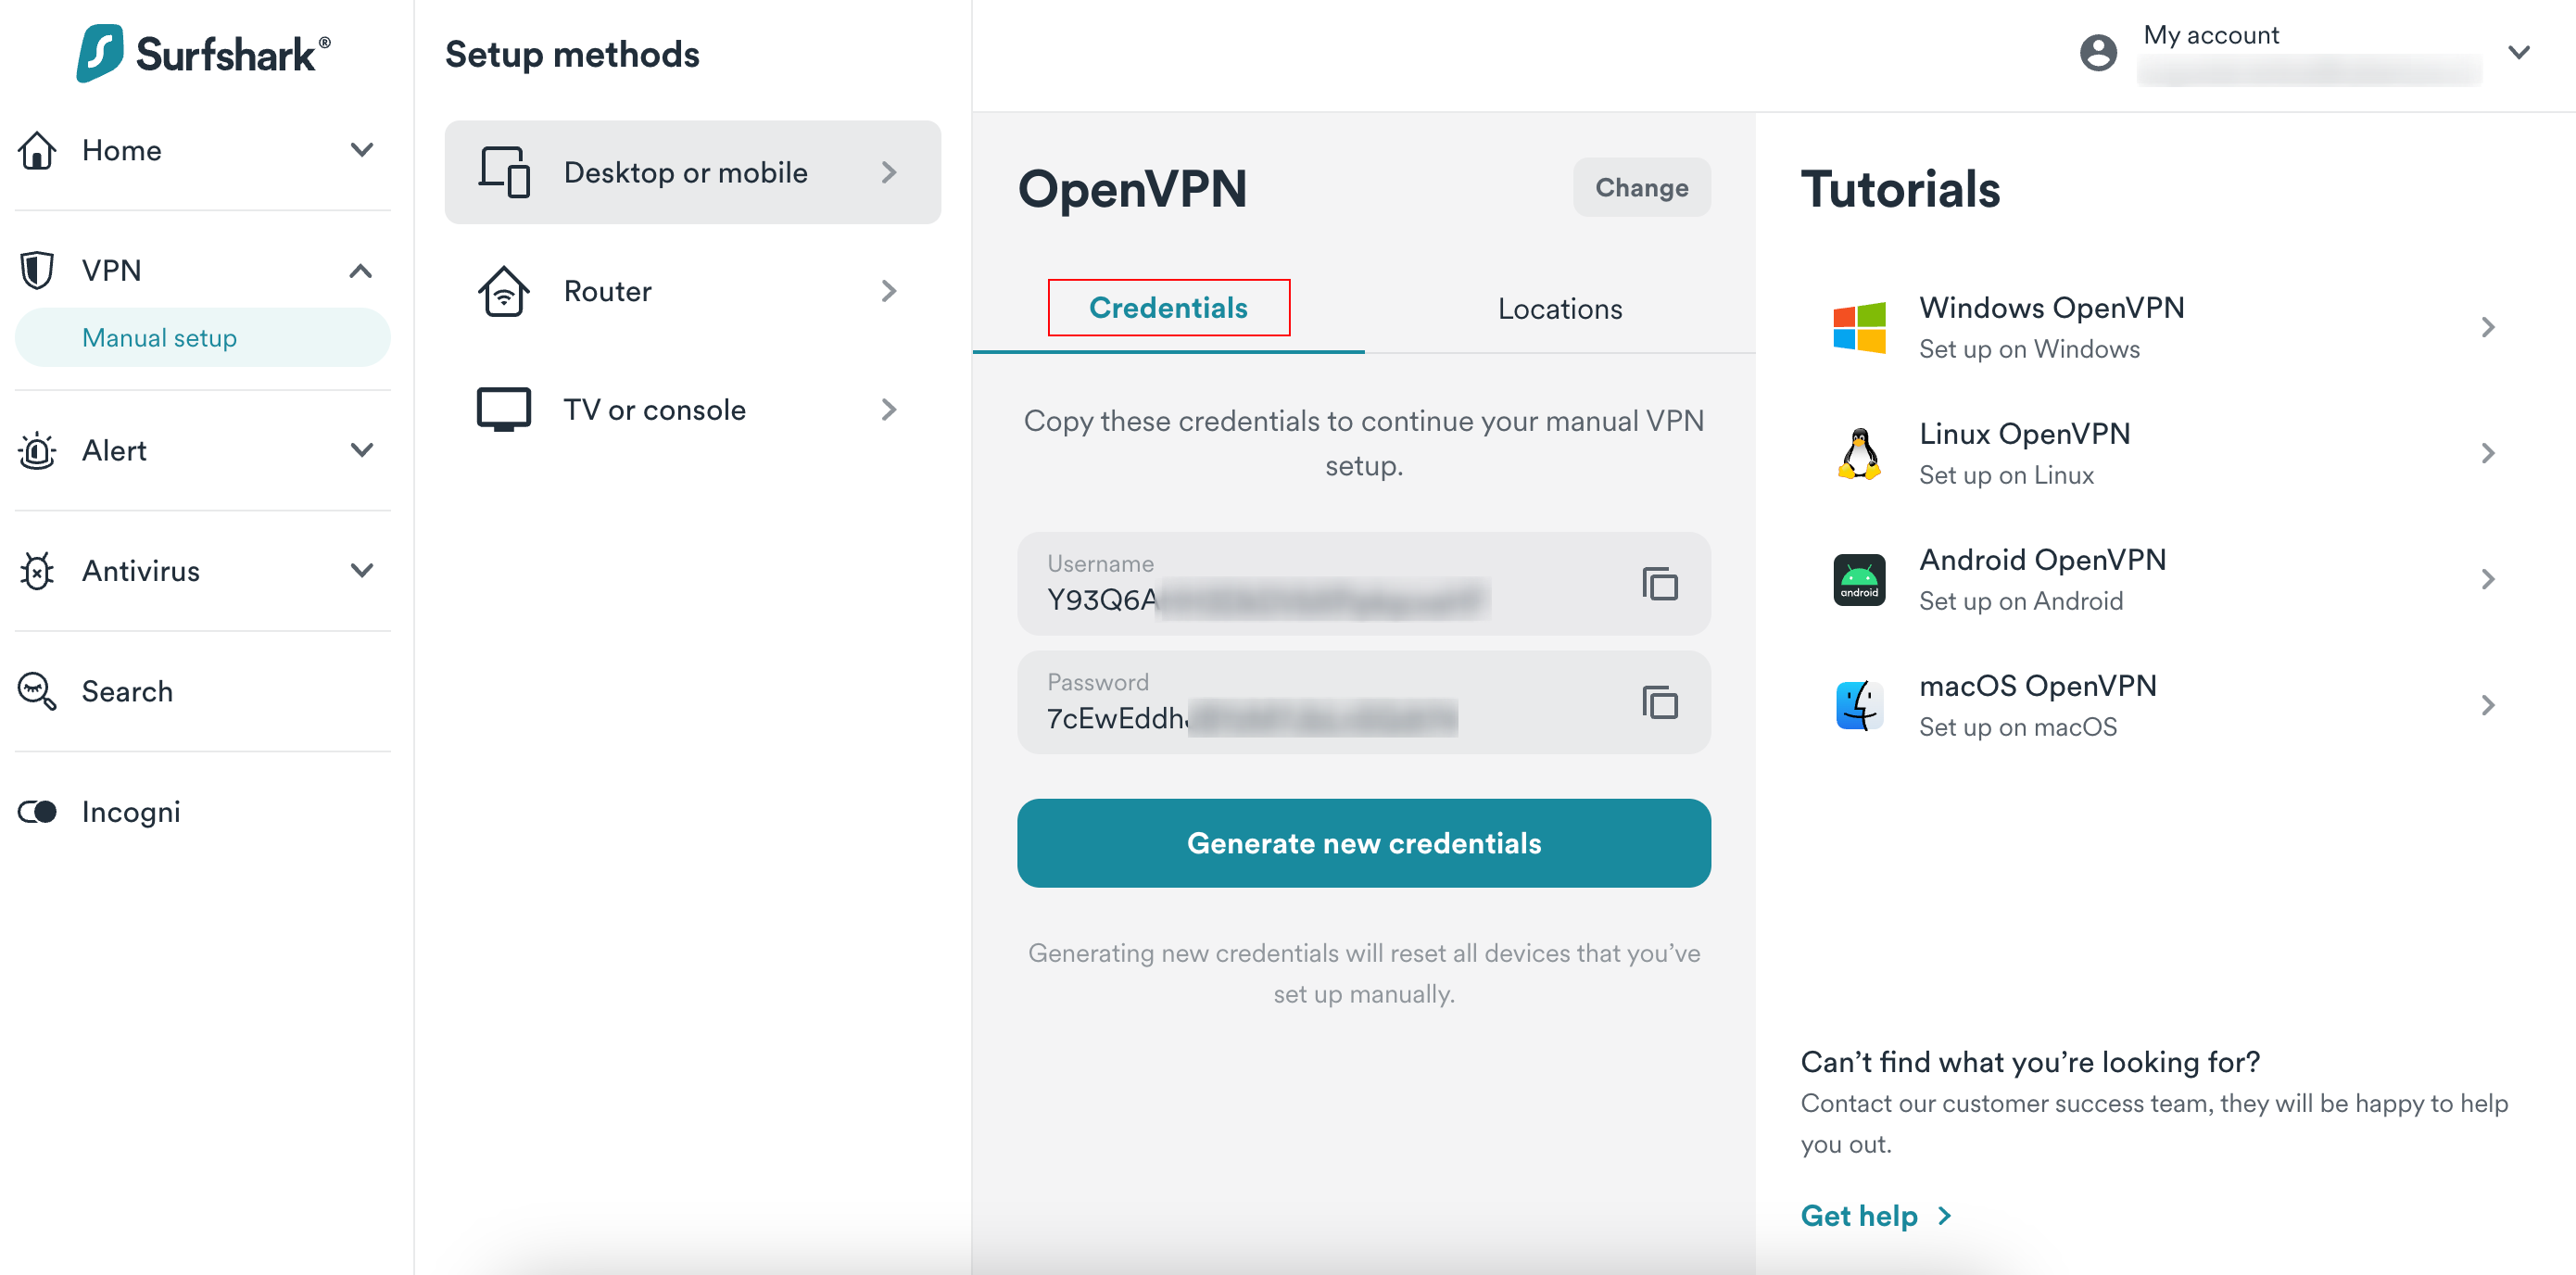
- Get the hostname and service credentials of the Surfshark server you want to connect.
- You can find these credentials on the SurfShark website. Press the Get Credentials button, and then the Surfshark website will open in your default browser, where you can get the credentials. Log In with your credentials if you’re not logged in already.
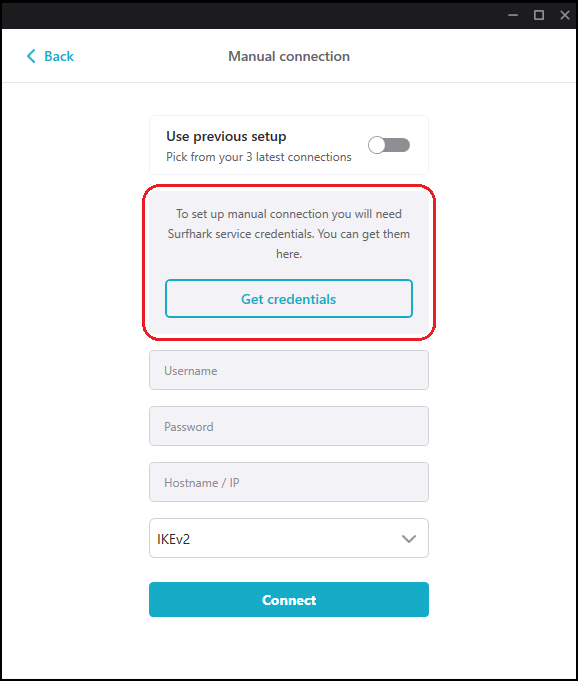
- After that, you will be able to see all the servers available. You can find the host names under every flag. Copy this hostname so you can use it later.
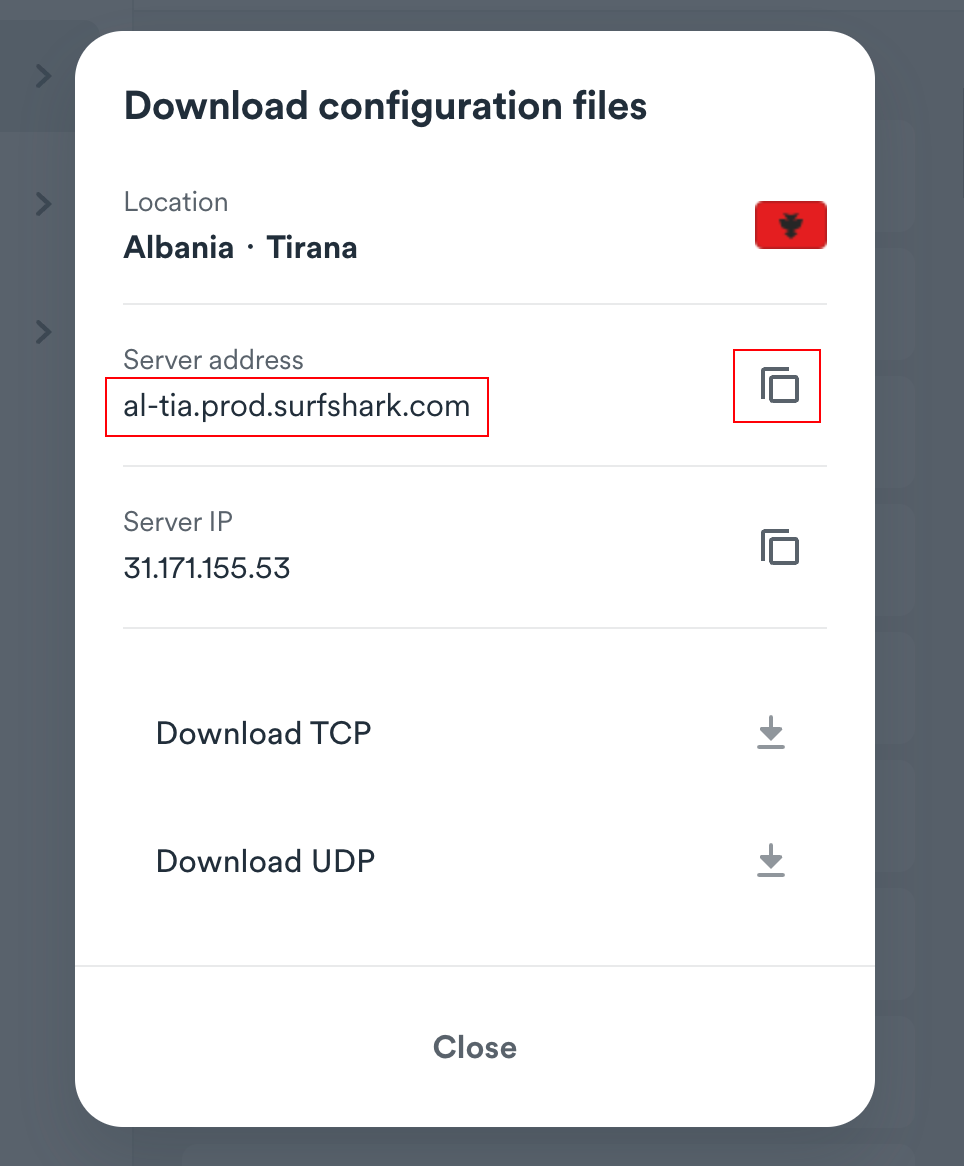
- Click credentials to find the credentials of your required server to enter them in the manual connections tab.
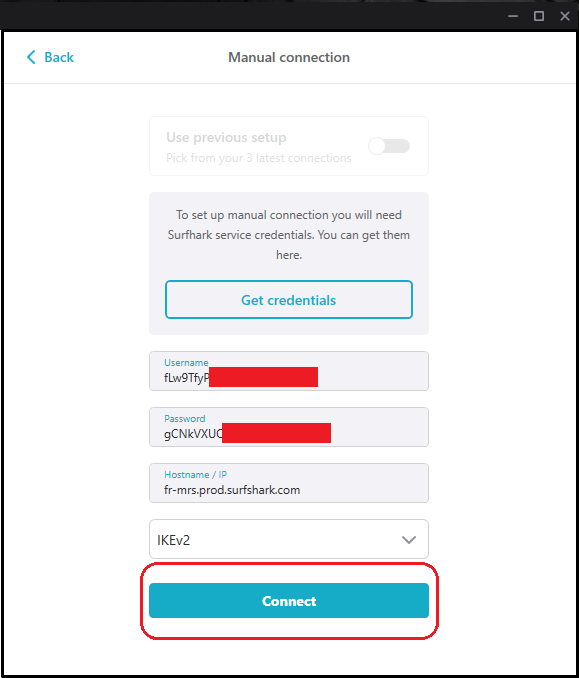
4. Fill in the required details.
- Username: Your Surfshark username.
- Password: Your Surfshark password.
- Hostname: Paste the Hostname you copied in step 3 or the IP address you copied in step 3.
- Protocol: Choose OpenVPN UDP or OpenVPN TCP, or leave it default.
- Port: If you choose OpenVPN protocol from the above option, you will be asked to provide a port. Here you can enter:
- 3433 for OpenVPN UDP
- 8443 for OpenVPN TCP
- Get connected manually by clicking on Connect.
5- When done correctly, you will be shown a successfully connected confirmation on the next page.
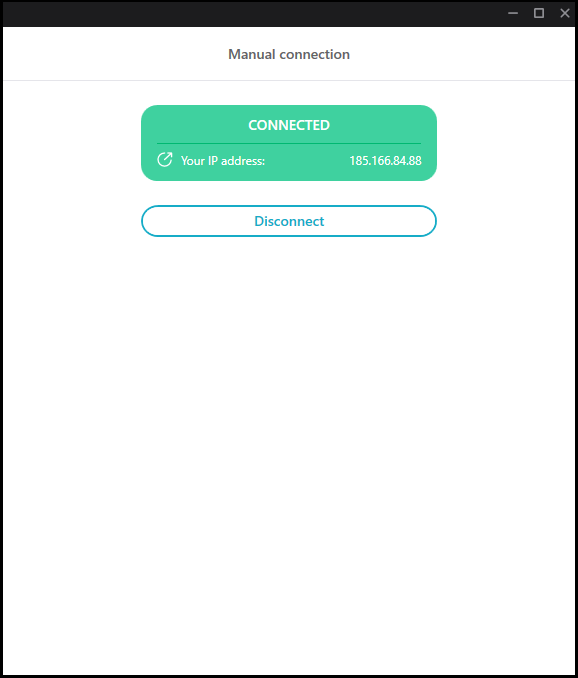
Congratulation! You are now connected to the Surfshark server!
This is how to set up a VPN on Windows manually. You can learn more about it with the help of Surfshark Review in USA.
FAQs – Surfshark on Windows
Does Surfshark work on Windows?
Why can't I install Surfshark on Windows?
Is it safe to use Surfshark on Windows?
Is Surfshark good for Windows?
Can Surfshark be trusted?
Wrapping UP!
Surfshark app for Windows is one of the best VPNs in the current competition, and its discounted price makes it better than all of its competitors. You can use Surfshark on Windows and unlock all the restricted websites by changing your server.
To subscribe to Surfshark for PC, download the Surfshark Windows version and install their Windows application.
You can also get a Surfshark 7-day free trial and test their application and other features. Surfshark for PC will not charge you for the first 7 days, and after that, you can get their subscription for future use.
You can cancel Surfshark if you can’t find your favorite server or contact Surfshark customer service to learn how to set up a VPN on Windows.