Cyberghost on Routers – Complete Guide 2023

Are you looking for the most secure VPNs online? CyberGhost can be the right choice for your needs.
CyberGhost is one of the best VPNs in the current era and the number one choice of many individuals worldwide. With a CyberGhost subscription, people can use CyberGhost on routers, PCs, mobiles, and laptops everywhere, thanks to the wide number of operating systems it supports.
CyberGhost router setup comes with the OpenVPN feature. You can use it with multiple devices at your home easily that support the native protocol OpenVPN. This thing also depends on a few more factors, such as the firmware of your device. If your device supports the protocols, you can establish a proper connection.
You can also activate cyberghost kill switch, while configuring it on your router, so whenever there is a security threat to your device such as IP leak. Cyberghost kill switch will be activated and protects your data.
In this article, we will focus on how you can connect CyberGhost on routers because when you connect to the router, you automatically start using the internet from your desired server on all the devices connected to this router. So, learn to use CyberGhost on routers and ease your way into technology.
How To Setup CyberGhost on Routers – Quick Guide
Don’t have much time but want to learn how to set up CyberGhost on routers? Don’t worry! Just follow these easy steps.
- Go to theCyberGhost official website and create a free account by entering your credentials for your CyberGhost router setup.
- Buy a good subscription from your account management section. The activation will be done automatically for you.
- Optional: If you have an activation key that you might have obtained when you purchased the subscription offline or by Bitcoin, you can search online for how to use that or check the CyberGhost review USA for more help.
This is how you set up the CyberGhost VPN on routers.
How to Setup CyberGhost on OpenVPN on DD-WRT Routers
Here is a detailed step-by-step guide that will enable you to do a CyberGhost router setup on OpenVPN on DD-WRT routers.
Step 1
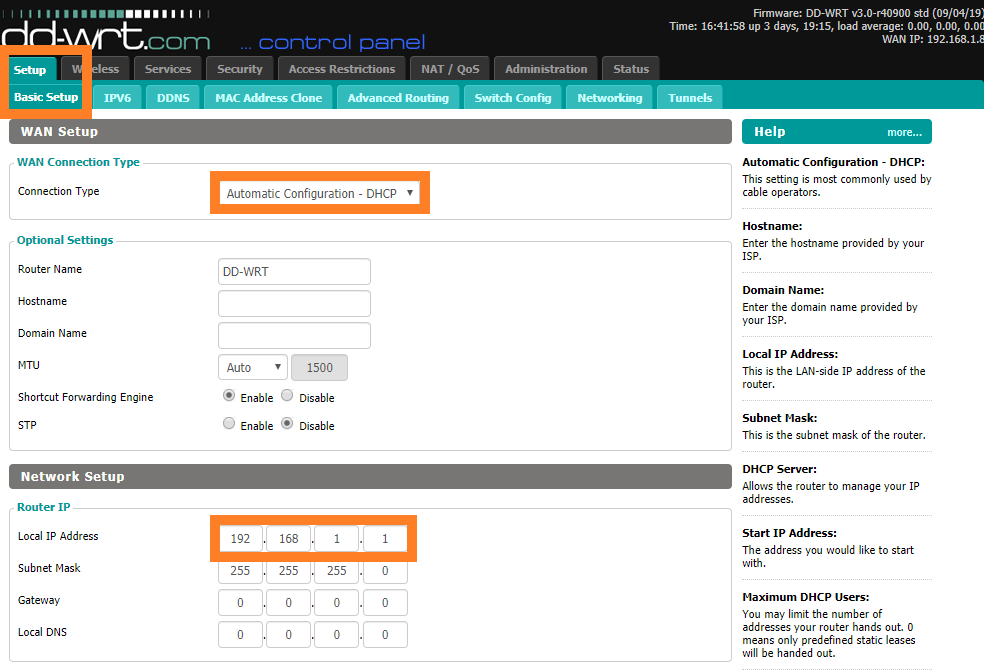
Ensure that your DD-WRT router is connected to the internet. Go to your Router Management Console by entering your router management address. It is usually 192.168.1.1 if you haven’t changed it manually.
- Go to the ‘Setup’ section and click ‘Basic Setup’. Ensure that ‘connection type’ is set to ‘Automatic Configuration DHCP’. Next, set a Local IP address by going to the ‘Network Setup’ and setting up the ‘Local IP address.’ Now, you can use this address to access your Router Management Console.
Note: It will work okay if ‘Automatic Configuration’ is set as default. If your ISP has changed the settings, then tweak this.

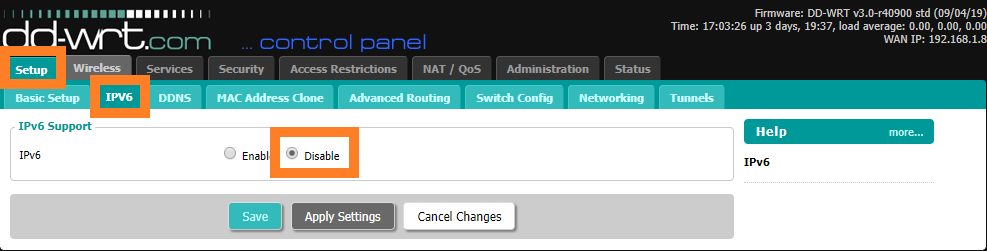
- Go to ‘Setup’ and then to IPv6 support, click Disable, and save the settings.
Step 2
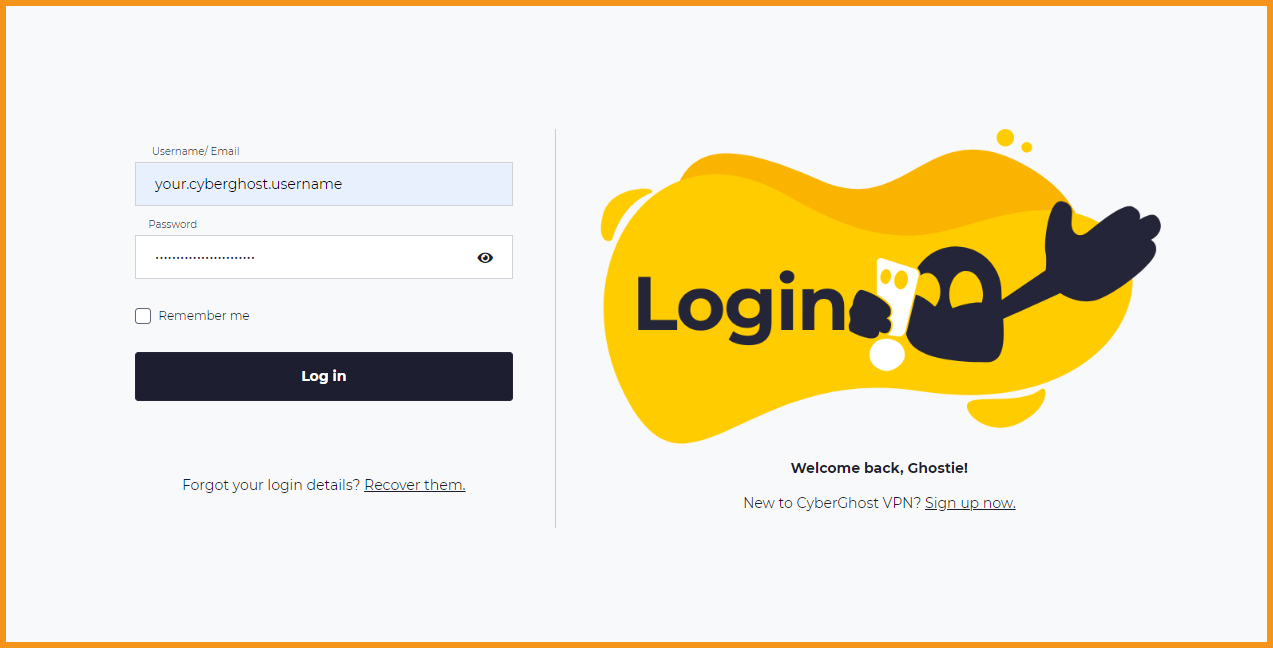
Go to the CyberGhost website and Log In by entering your username and password for your CyberGhost router connection.
- Click on ‘VPN’ from the menu on the left, click “Configure Device,” and then follow these points.

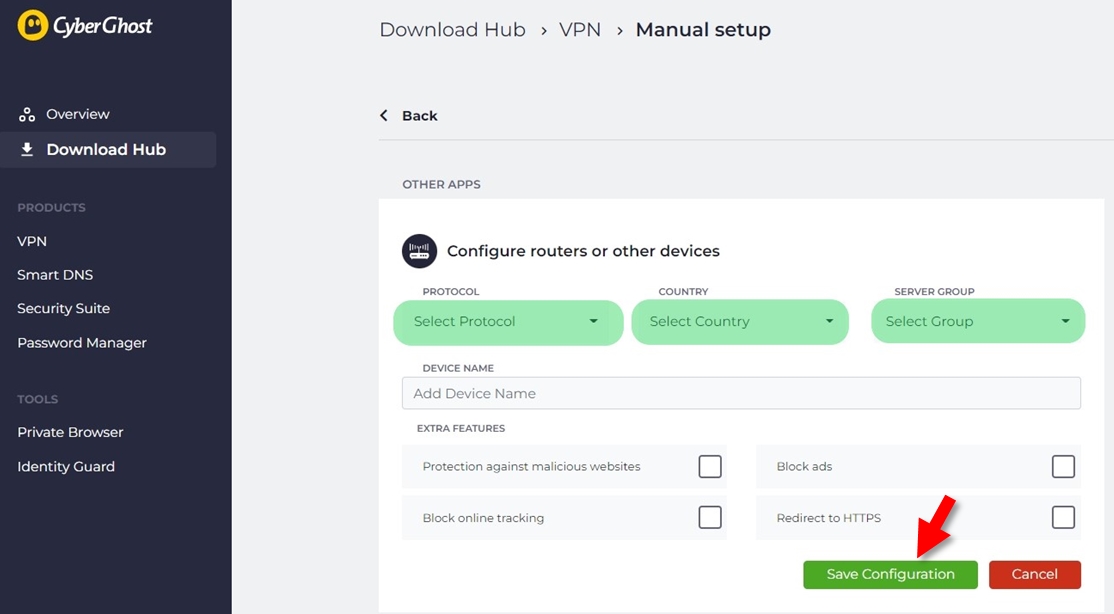
- Set the Protocol to OpenVPN to start the CyberGhost OpenVPN router setup.
- Select the desired country from where you want to surf the internet. CyberGhost will automatically choose the best server for your CyberGhost router connection.
- Select the server group and the OpenVPN Protocol according to your choice.
- OpenVPN UDP has faster speeds, but the downloads are sometimes broken.
- OpenVPN TCP has more stable connections but is a little bit slower.
- Click on “Save Configuration” after making your choices.
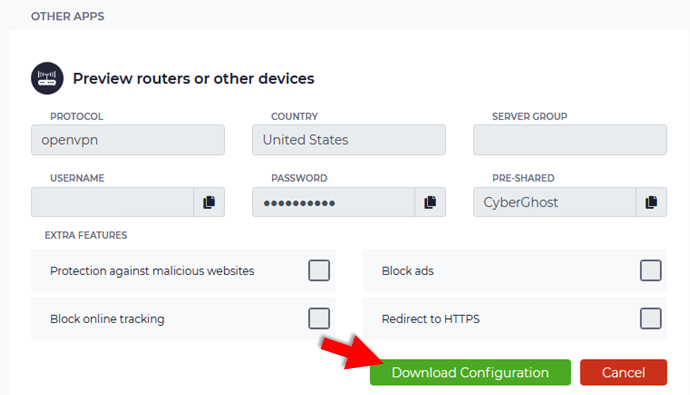
Click on “View Configuration” to see the credentials created for you on the configuration dashboard.

You should also take care of the following things after setting up your connection preferences:
- The server group is the server address you will be connected to.
- The username you will be assigned is only for this protocol. It is not your regular one.
- Similar to the username, the password generated is for this protocol only.
- Pre-shared key.
Download the configuration by clicking on “Download Configuration.” Make a proper location on your computer to extract the zip file you downloaded.
Your zip file will contain the following files, which are extremely important for your CyberGhost OpenVPN router setup.
- A ca.crt file, which is the certificate from the certification authority.
- A client.crt file, which is the user certification file.
- A client.key file, which is your private key file
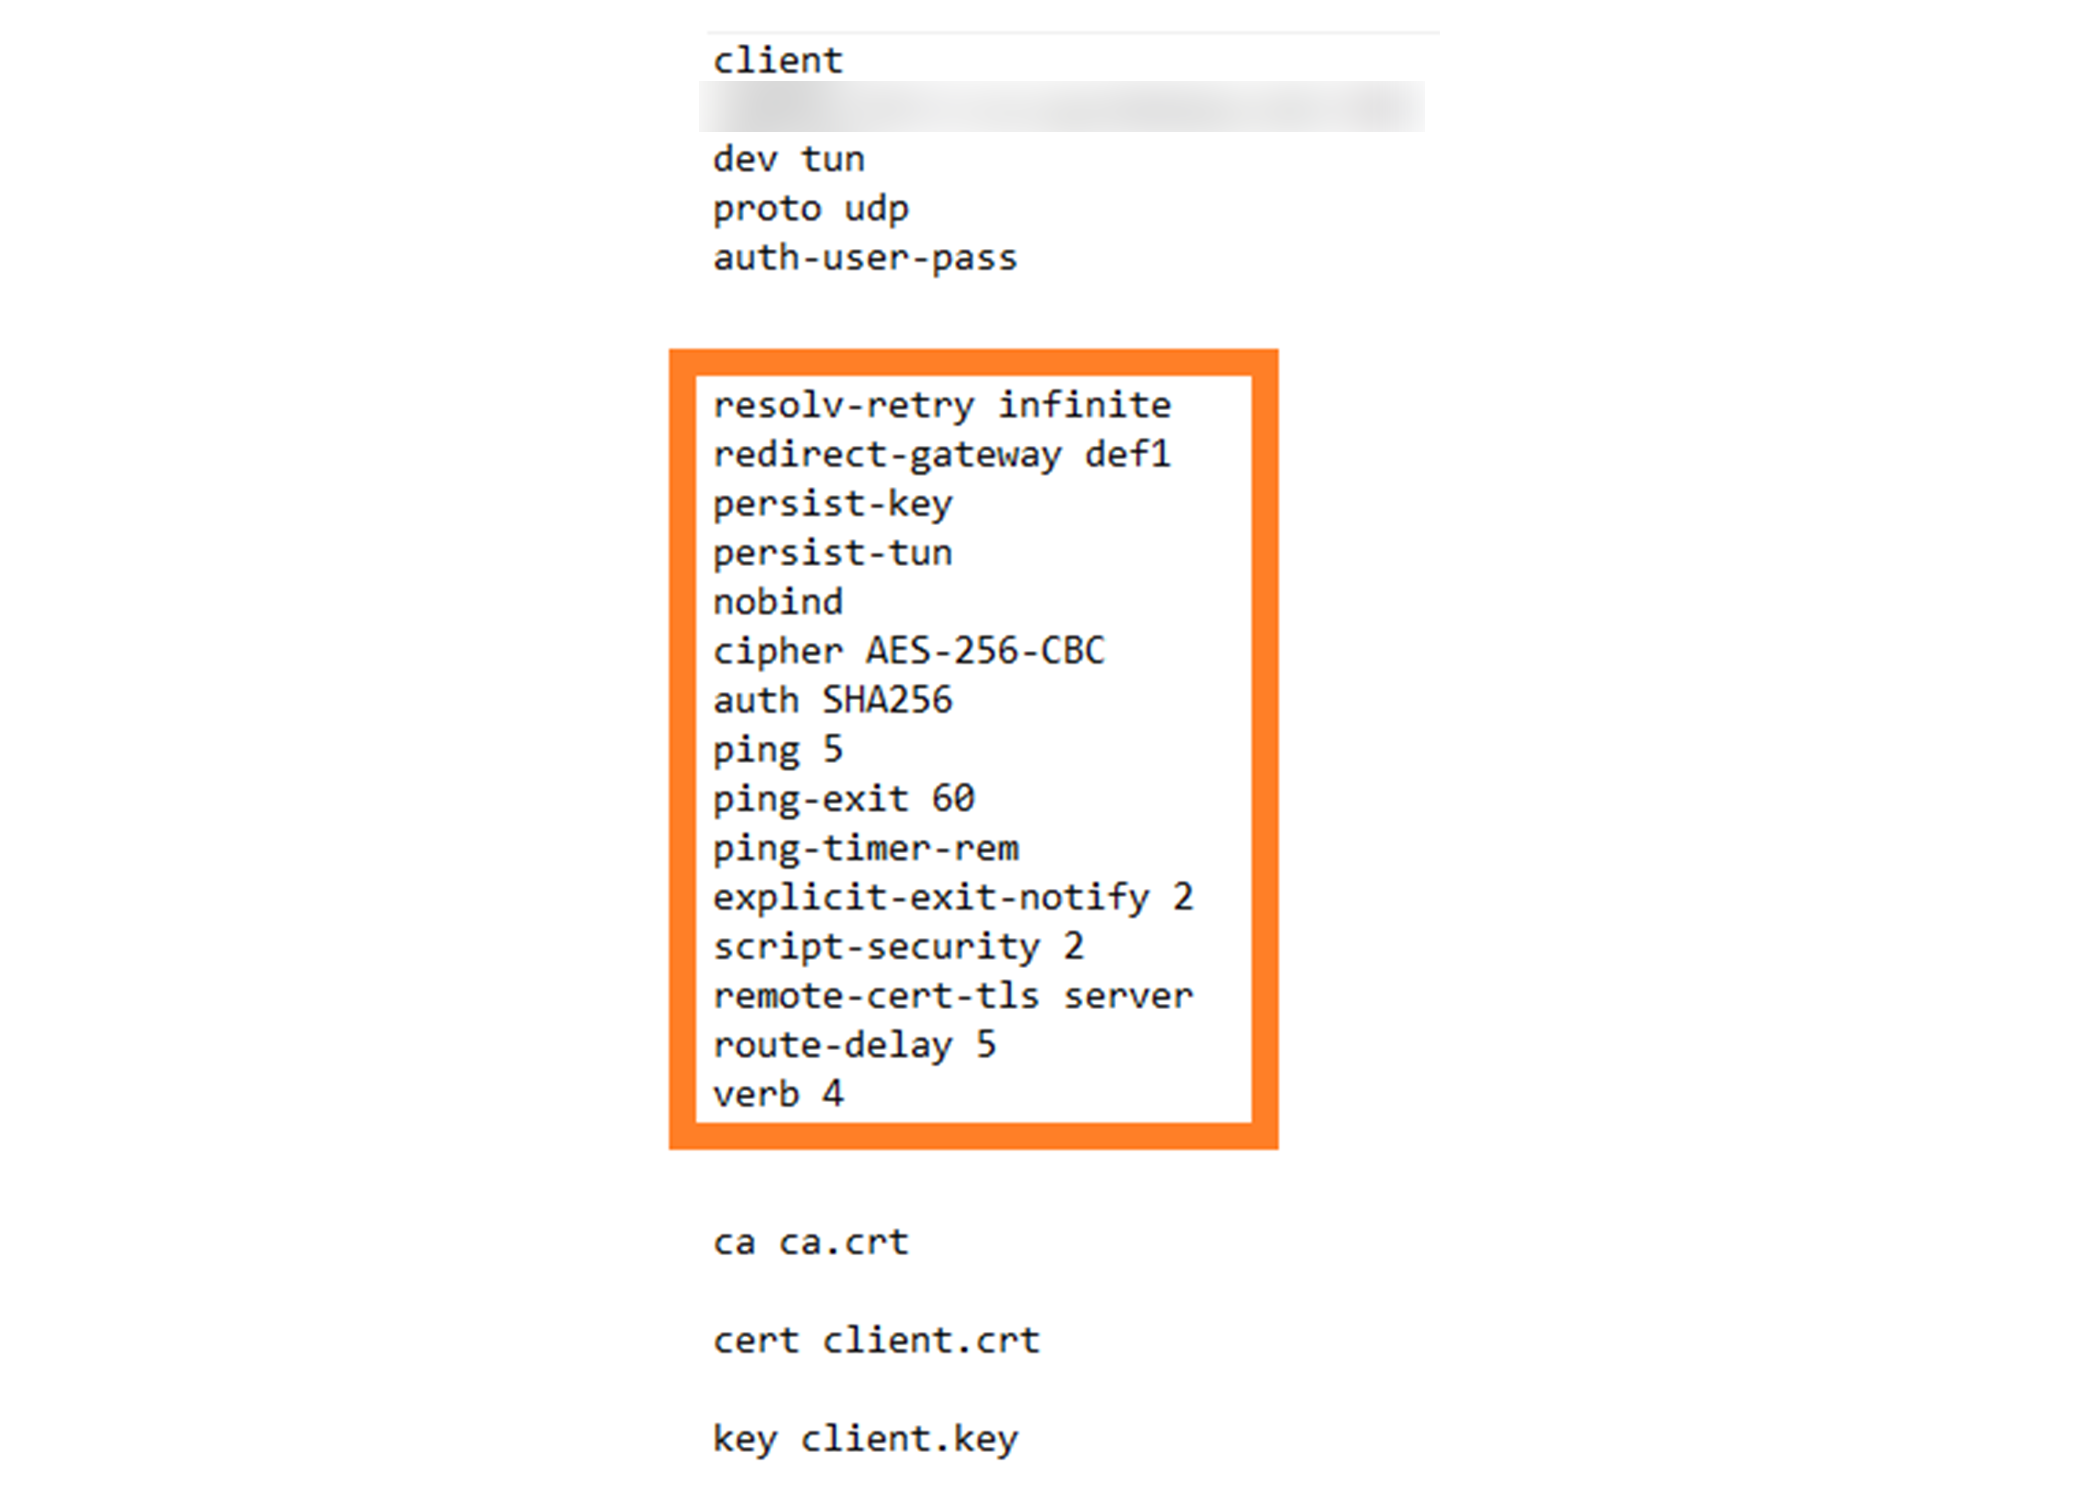
- An openvpn.ovpn file, which is your OpenVPN configuration file.
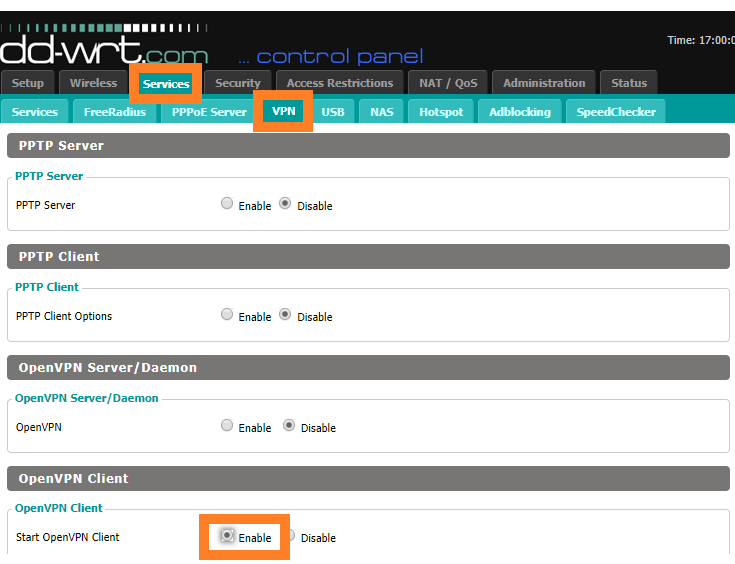
Step 3
Type your router management address, and when your router management console opens, click ‘Service’ and then click ‘VPN.’
Find the ‘OpenVPN client’ option and check on enable. Now fill in the details below:
- Server IP / Name: Enter the username generated in the 2nd step.
- Port: 443
- Tunnel Device: TUN
- Tunnel Protocol: UDP or TCP (based on the choice you made in Step 1)
- Encryption Cipher: AES-256-CBC
- Hash Algorithm: SHA256
- User Pass Authentication: Enable
- USERNAME: The generated username from step 2.
- PASSWORD: The generated password from step 2.
- Advanced Options: Enabled
- TLS Cipher: None
- LZO Compression: Disabled
- NAT: Enable
- Firewall Protection: Enable
- IP Address: leave blank
- Subnet Mask: leave blank
- Tunnel MTU setting: 1500
- Tunnel UDP Fragment: leave blank
- Tunnel UDP MSS-Fix: Disable
- nsCertType verification: Leave unchecked
- TLS Auth Key: leave blank
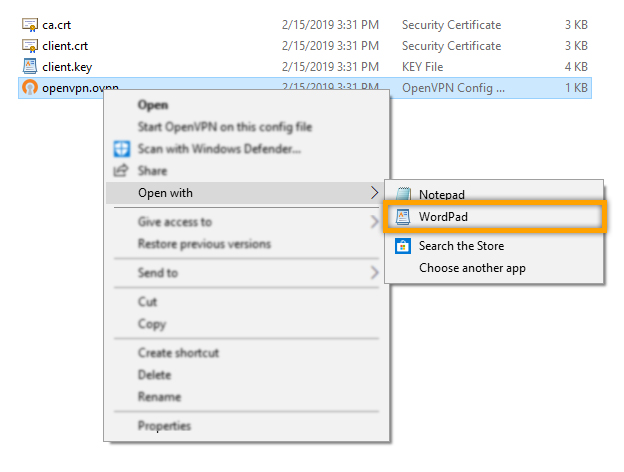
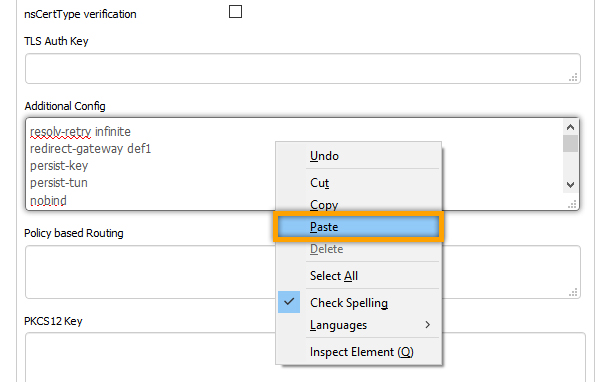
- Additional Config: Go to your folder where you extracted the file you downloaded in step 2, then right-click on the “openvpn.ovpn” file, click on open with, and then select Wordpad or any text editor that is shown on your list.
- Copy from the “resolv-retry infinite” to ‘verb 4’.
- Return to the console, right-click the additional config field, and press paste.
- Policy-based Routing: leave blank
- PKCS12 Key: leave blank
- Static Key: leave blank
- CA Cert: Copy all the content in the “CA.crt” file, just like we did with the openvpn.ovpn file above and paste it into the given box.
- Public Client Cert: Copy all the content in the “client.crt” file, just like we did with the openvpn.ovpn file above and paste it into the given box.
- Private Client Key: Copy all the content in the “client.key” file, just like we did with the openvpn.ovpn file above and paste it into the given box.
- Press the “Save” button and then press “Apply settings.”
Step 4
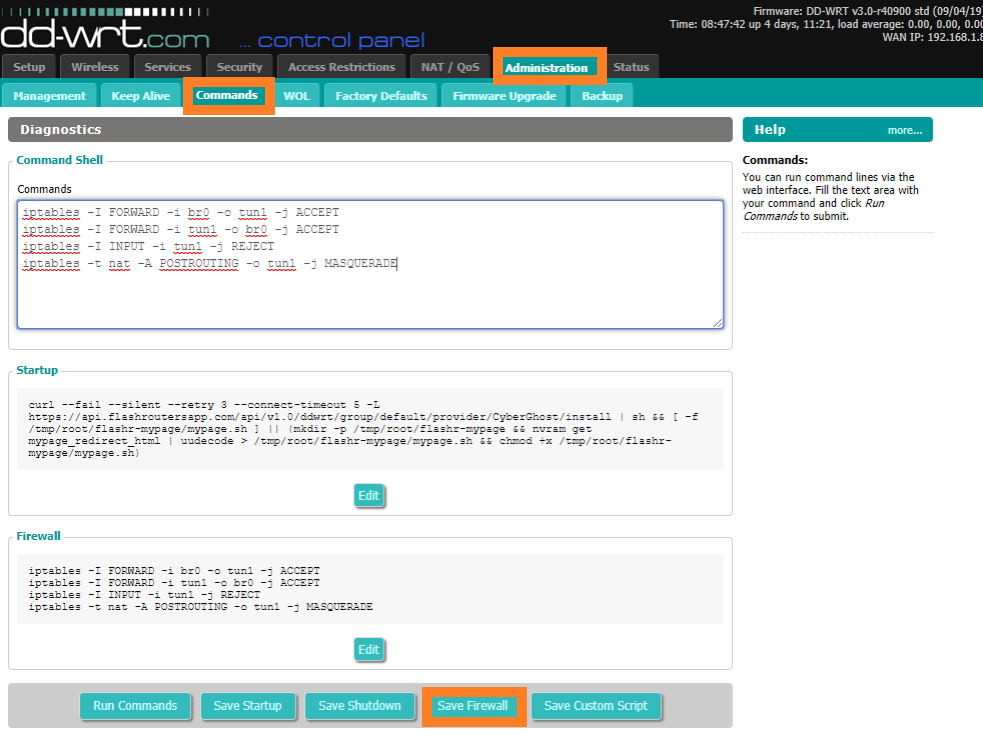
Go to the “Administrations” tab and click on commands.
Copy the following commands and paste them into the Command Shell field.
iptables -I FORWARD -i br0 -o tun1 -j ACCEPT
iptables -I FORWARD -i tun1 -o br0 -j ACCEPT
iptables -I INPUT -i tun1 -j REJECT
iptables -t nat -A POSTROUTING -o tun1 -j MASQUERADE
Click on the “Save Firewall” button after doing it.
Now you can restart your device by going to the “Adminstration” tab, then click on Management, go to the bottom of the page, and then press the “Reboot Router” button.
NOTE: Please wait some time so that the settings may apply successfully.
Go to the Status tab and click Open VPN to check if the VPN is connected. Here, you can see under the state heading the following message: Client: CONNECTED SUCCESS.
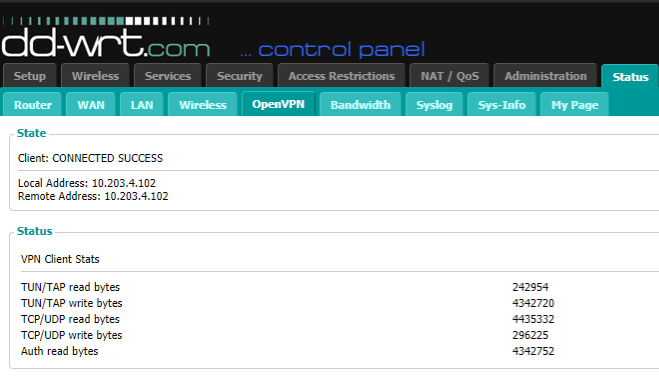
After this, restart your browser, go to any IP checker site, and then check your IP. It will be changed to your desired location.
CyberGhost on FlashRouters Privacy App (DD-WRT)
There are a few requirements for the FlashRouters Privacy app for the CyberGhost VPN router connection. Minimum required DD-WRT build for FlashRouters Privacy App:
Minimum required DD-WRT build for FlashRouters Privacy App Install: build version 02-12-2018-r3492.
Minimum required DD-WRT build for Simple Setup FlashRouters Privacy App: build version 08-30-2018-r36808.
Here is the official list of routers thatCyberGhost supports for CyberGhost router connection.
- Netgear R6300v2
- Netgear R6400v2
- Netgear R7000
- Netgear R7000P
- Netgear R7800
- Netgear R8000
- Netgear R9000
- Linksys WRT1200AC
- Linksys WRT1900ACv1
- Linksys WRT1900ACv2
- Linksys WRT1900ACS
- Linksys WRT3200ACM
- Linksys WRT32X
- Asus RT-AC56U
- Asus RT-AC66U
- Asus RT-AC68U
- Asus RT-AC87U
- Asus RT-AC3100
- Asus RT-AC5300
Disclaimer: The app is built for DD-WRT-supported routers with a flash memory of at least 16MB. You can also contact the Cyberghost Customer Support For American Users if you have questions about the CyberGhost VPN router connection.
How to install the FlashRouters Privacy App
Here is how you can install the FlashRouters Privacy App for the CyberGhost VPN router connection:
- Make sure that your FlashRouter is connected to the internet.
- Go to the “Administration panel,” click “Commands,” and copy and paste the following line:
- curl –silent –retry 3 https://api.flashroutersapp.com/api/v1.0/ddwrt/group/default/provider/CGG4/install | sh
- Click “Run Commands”.
- You should see an Installation Successful message readout.
- Download OpenVPN configuration files
- Connecting to CyberGhost in the FlashRouters Privacy App
- Using Auto-Connect and Global Kill Switch
You can also get help from this guide if you have difficulty understanding the steps mentioned above for a CyberGhost VPN router connection.
FAQs – Cyberghost on Routers
What Should I Do if the CyberGhost on Router Doesn't Work?
Can you put CyberGhost VPN on a router?
Does CyberGhost VPN work with a wifi router?
Conclusion
You can install CyberGhost on routers easily with the help of above-mentioned installation guide. We understand that the installation is not straightforward, but we tried our best to explain it in the easiest way possible, and we hope that if you follow our step-by-step guide, you can install CyberGhost on routers.
We have also covered a few other related topics and related FAQs that people might ask when they follow this guide. So follow our guide, install CyberGhost on your router, even if you want free options, Don’t put your privacy at risk with a free VPN! Get the CyberGhost VPN free trial with no credit card requirements and use a premium VPN at no cost to you, you can use it as Free VPN for Router, and enjoy your favorite content on all devices without any restrictions.