How To Enable NordVPN Kill Switch in New Zealand – [Easy Steps Guide – 2023]

Curious if NordVPN has a kill switch? Indeed, NordVPN provides this vital safeguard for both mobile and desktop apps, a crucial defense for your digital privacy. Enabling the NordVPN Kill Switch in New Zealand is highly recommended to ensure your online security.
In the event of a VPN connection drop, the NordVPN kill switch free you from stress and becomes your shield, instantly blocking internet access until your connection to the VPN server is reestablished.
A leaked IP can undermine the very purpose of using a VPN, rendering you vulnerable to web trackers and malicious entities. It’s imperative to have the best VPN with a reliable kill switch in place to prevent such exposures.
NordVPN kill switch free iPhone feature is available for iOS users to enhance their online security and privacy.
Explore all of NordVPN’s remarkable features in our comprehensive NordVPN review in New Zealand. You can even experience its capabilities firsthand by taking advantage of NordVPN free trial in New Zealand, followed by a 30-day money-back policy, where you can test the kill switch feature yourself. You can also learn how to enable NordVPN Kill switch on iPhone.
In case you don’t like the service, you may cancel NordVPN subscription in New Zealand.
Uncover the power of NordVPN kill switch free iOS and more, fortify your online defenses. Don’t leave your digital privacy to chance – keep it locked down with NordVPN.
How to Enable NordVPN Kill Switch in New Zealand? [Easy Steps Guide]
Confused about how to turn on the NordVPN kill switch in New Zealand? Activating it is a straightforward process. While it’s intuitive, especially for those new to this feature, we’ve outlined step-by-step instructions for both desktop and mobile users to ensure clarity and ease.
- Access the NordVPN Website:
Start by opening your preferred web browser and navigate to the official NordVPN website. Once there, locate the “Download VPN” link positioned prominently at the top-middle of the page. If you can’t find it, you might need to click the hamburger menu icon in the top-right corner or scroll down to discover the “Download” link tailored for your specific platform.
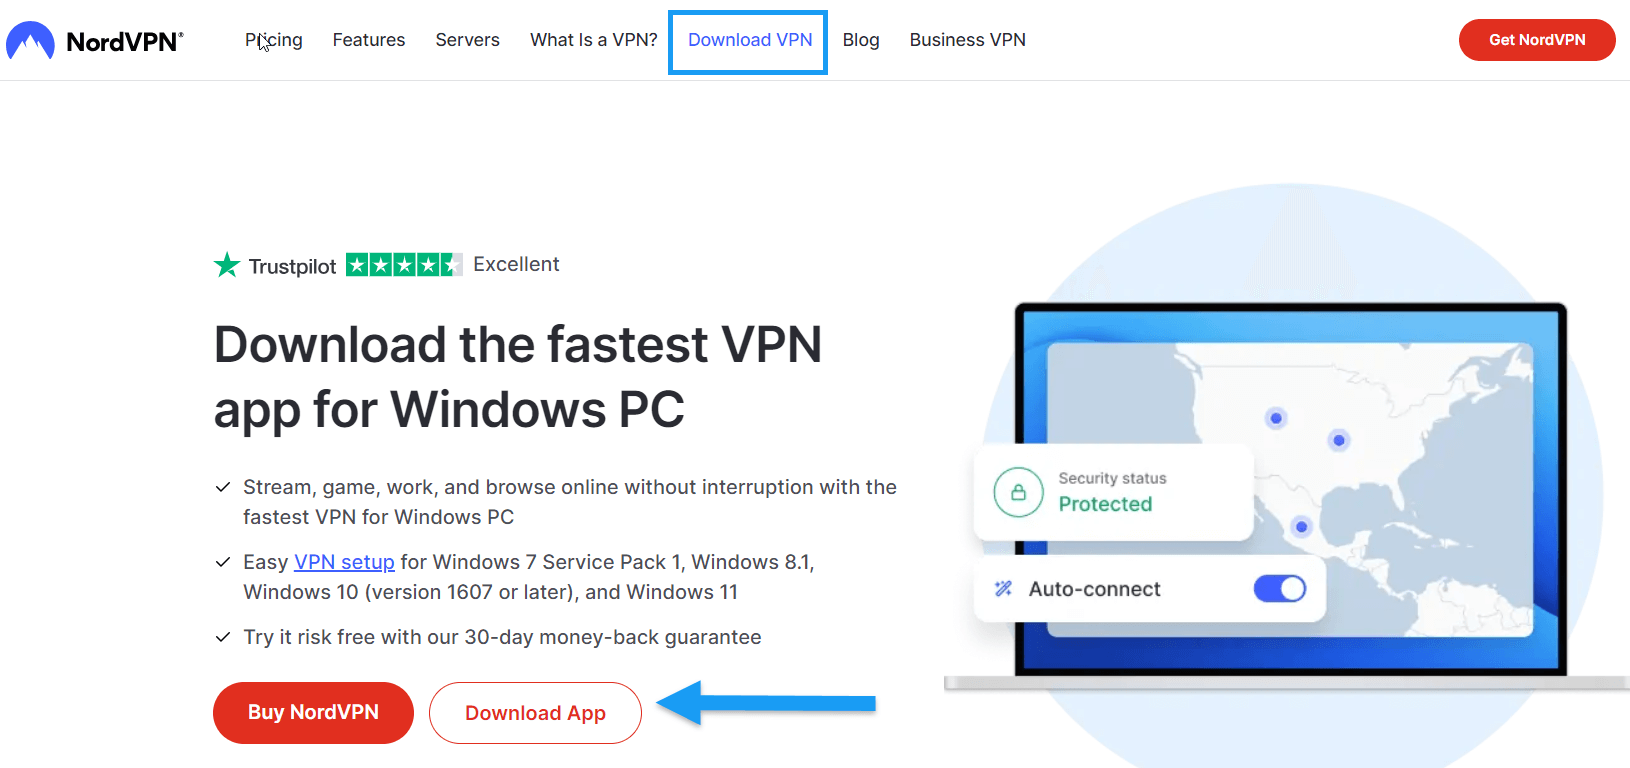
- Download the App:
On the website, you will see a “Download” button at the top of the page. Click on this button to initiate the download process for NordVPN’s Windows application.
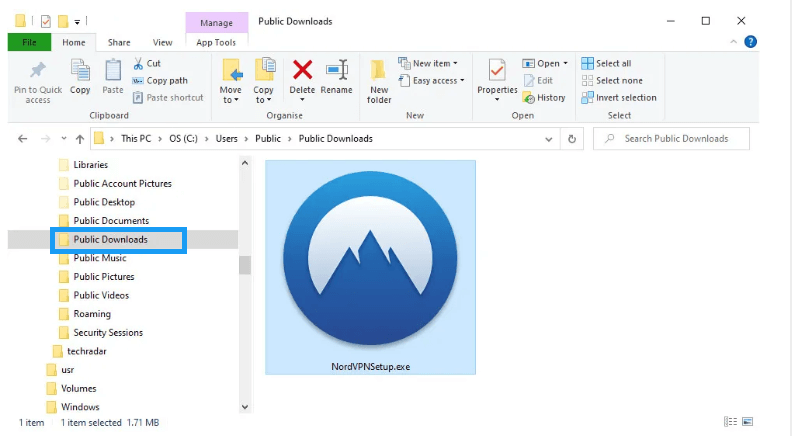
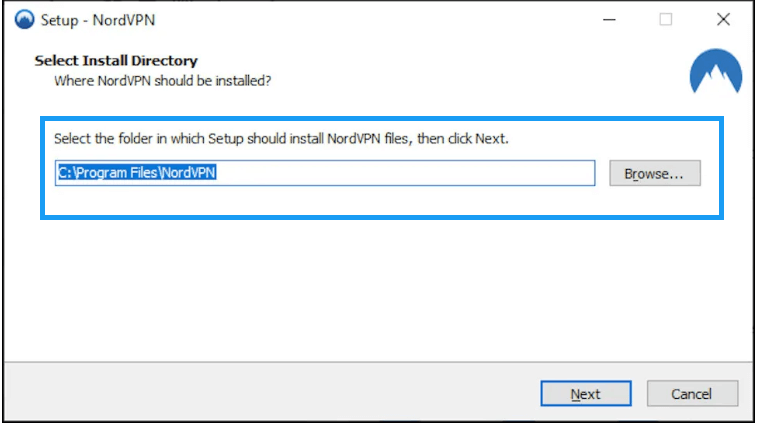
- Installation:
After the NordVPN setup file (NordVPNSetup.exe) has been fully downloaded, head to your Windows PC’s downloads folder. Double-click on the executable file to begin the installation process.
- Login:
Upon launching the NordVPN app for Windows for the first time, it will prompt you to log in. Complete this step through your web browser by entering your NordVPN email and password. Once done, choose the option to open the app, and you’ll return to the application, ready to use the service.
- Access Settings:
In the lower-left corner of NordVPN’s Windows app, adjacent to the minimize button, you’ll find a gear icon representing the settings button. Click on this icon to access the app’s settings.
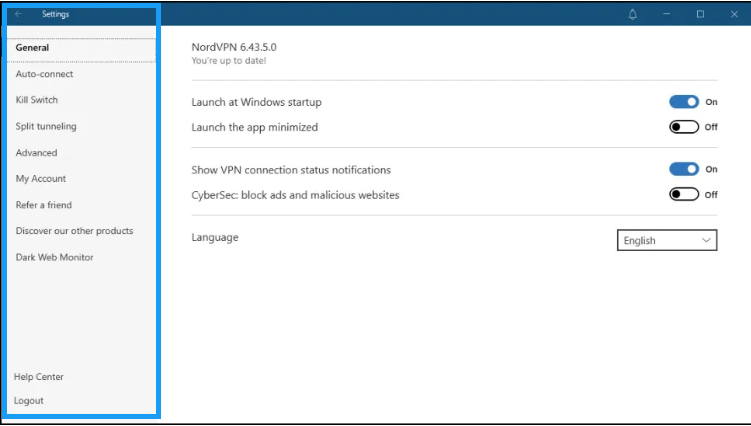
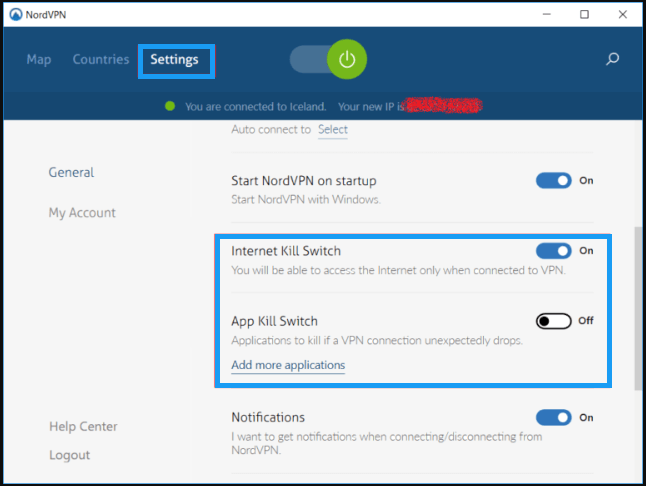
- Enable Internet Kill Switch:
Once within NordVPN’s settings, navigate to the “Kill Switch” option located on the left side of the app.
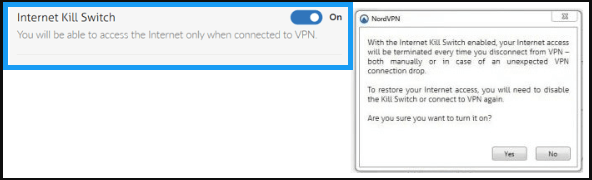
- Confirmation:
Upon toggling the Internet Kill Switch, a warning message will appear to explain the implications of enabling this feature. Confirm your choice by clicking “Yes.”
- Enable App Kill Switch:
In the same “Kill Switch” settings section, you can also activate the App Kill Switch. However, to enable this feature, you’ll need to select which applications should be closed when you disconnect from the VPN or if your connection unexpectedly drops.
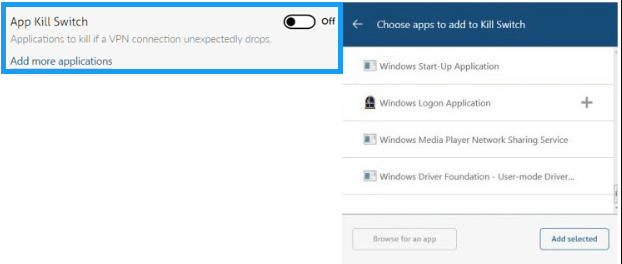
- Select Apps:
Click on “Add apps,” and a list of currently running software will be displayed. If you can’t find the specific program you’re looking for, you have the option to manually search for it by clicking on “Browse apps.”
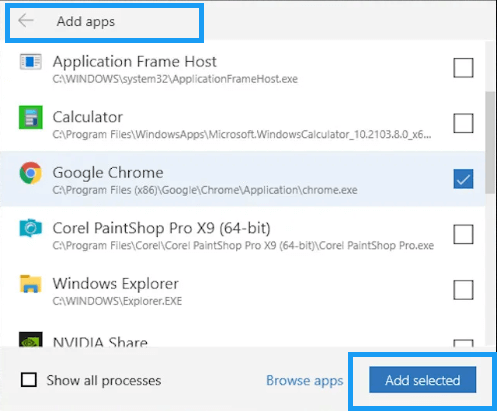
Choose the applications you want to safeguard with the App Kill Switch by clicking the checkbox next to their names. Confirm your selection by clicking “Add selected.” The chosen apps will now appear under the App Kill Switch section, and you can remove them at any time by clicking the small ‘x’ next to their names.
- Connect to a Server:
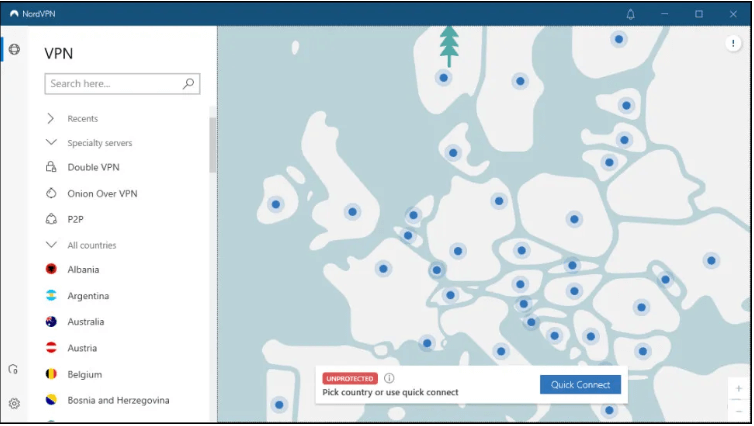
With the NordVPN Kill Switch features now configured, it’s time to connect to a NordVPN server. If you’re in a hurry, you can simply click “Quick connect” at the bottom of the app, and NordVPN will automatically connect you to a server.
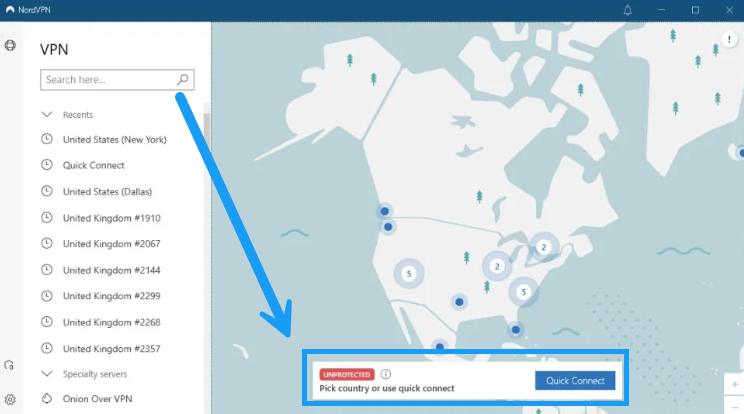
However, if you prefer to connect to a specific country, scroll down the left column in the app and select your desired location. Alternatively, you can choose a country directly from the map in the center of the app by clicking on the corresponding blue marker.
By following these comprehensive steps, you can effectively activate the NordVPN Kill Switch on your Windows device, significantly enhancing your online security and privacy.
How to Enable NordVPN Kill Switch in New Zealand on Linux?
For NordVPN on Linux in New Zealand, activate the NordVPN Kill Switch on Linux with a simple command: “NordVPN set killswitch on.” To deactivate it, use “NordVPN set killswitch off.” To check its status, employ “NordVPN settings.” These swift commands grant you control over the protective shield, ensuring your online security is just a few keystrokes away.
Use the above method, and you will not be worried about how to turn on NordVPN kill switch.
How to Enable NordVPN Kill Switch in New Zealand on macOS?
Activating the NordVPN kill switch on the Mac client closely mirrors the process for the Linux version we previously explained. However, for clarity, let’s outline the steps for NordVPN Kill Switch in New Zealand on macOS:
- Commence by opening the application on your Mac.
- Proceed to the application settings, where you will spot the ‘Kill Switch’ option.
- Engage it to ensure your online security is reinforced and enjoy uninterrupted protection.
To get complete details on NordVPN Kill Switch on macOS, check out our NordVPN for Mac in New Zealand review.
How to Enable NordVPN Kill Switch in New Zealand on iOS?
To activate the kill switch on iOS, simply adhere to these steps. Here’s how to enable NordVPN Kill switch iOS:
- Open the NordVPN iOS app.
- Access your account and settings by tapping the icon at the top left.
- Within your settings, you’ll find the “kill switch” option.
- Switch the NordVPN kill switch disable to enable by using the toggle switch, and you’re all set for enhanced security.
Follow the above steps, and you can learn how to enable NordVPN Kill switch iOS 14 as well.
How to Enable NordVPN Kill Switch in New Zealand on Android?
Confused about how to enable NordVPN Kill Switch Android? Enabling the Android VPN kill switch varies from iOS, so here are the steps you need:
- First, navigate to your system settings and ensure your Android device is running on version 7.0+.
- Now, under the ‘wireless and networks’ section, locate and select ‘More Connection Setting.’
- Tap on ‘VPN’ to access the NordVPN settings.
- Next, click on the gear icon beside NordVPN, and activate the “Always-on VPN” feature to ensure uninterrupted protection on NordVPN kill switch Android.
Get the most out of this NordVPN kill switch free Android by following our NordVPN for Android in New Zealand review.
Why you need a NordVPN kill switch in New Zealand?
A NordVPN kill switch free download is needed due to the following reasons:
- Incorporating extra layers of security:
If you find yourself in a nation governed by authoritarian rule and belong to categories like political activists, journalists, or bloggers, a Kill switch NordVPN iOS acts as a vital secondary defense.
- Safeguarding data privacy:
When handling sensitive or classified information in your professional role, it’s imperative to maintain constant encryption. Kill switch NordVPN free provides the optimal shield against potential data leaks and unexpected connection interruptions. When it comes to preserving data privacy, access the NordVPN settings by tapping on ‘VPN’ to configure NordVPN as needed.
- Protecting personal secrets:
Facing social media account lockout is frustrating. Prior to entering sensitive data like passwords, activating the Kill switch NordVPN Android is a prudent measure, preventing any privacy compromises that may occur if your data is intercepted.
What does the NordVPN kill switch in New Zealand Do?
- The default mode of the NordVPN kill switch Windows deactivates internet access when a VPN connection unexpectedly drops due to errors or VPN-related issues, safeguarding your data.
- Alternatively, the NordVPN kill switch can also be set to disable internet access when manually disconnecting from the VPN or in the event of an unexpected connection drop. This mode ensures constant protection against data exposure.
- The VPN kill switch serves as a sophisticated security feature, shielding your digital data from inadvertent exposure. Should your VPN connection falter, it immediately cuts off internet access until your connection to the VPN server is reestablished, preserving your online privacy.
FAQs: How to Enable NordVPN Kill Switch in New Zealand
What if NordVPN's Kill Switch Doesn't Work in New Zealand?
How many types of Nord VPN kill Switch?
How to disable NordVPN kill switch in New Zealand on Linux?
Should I use NordVPN kill switch in New Zealand?
Conclusion
VPN users come from diverse backgrounds with varying purposes, yet a common thread unites them: a paramount concern for safeguarding their privacy. Whether individuals seek NordVPN for torrenting in New Zealand or accessing geo-restricted content, anonymity remains of utmost importance in today’s digital landscape.
Surprisingly, many users remain unaware of the existence and functionality of the NordVPN kill switch in New Zealand, a potent security feature.
In response to this Kill switch NordVPN not working knowledge gap, we’ve comprehensively covered the steps on how to enable NordVPN kill switch in New Zealand. By doing so, we aim to empower users with the benefit of NordVPN kill switch in New Zealand and enhance their online security, ensuring their digital activities remain private and secure.